Exchange 2013 and Load Balancing: What You Need to Know
Start Free TrialWhat are the major differences between Exchange 2010 and Exchange 2013?
To answer that let’s discuss the main architectural differences between Exchange 2010 and Exchange 2013. In Exchange 2010, there were five available Server Roles: Client Access, Hub Transport, Mailbox, Unified Messaging, and Edge Transport. In Exchange 2013, these Roles have been consolidated into just two main Roles: Client Access and Mailbox Server Roles.
Client Access Server Role: This Role now handles all client connectivity protocols including HTTPS/IMAP/POP3 as well as SMTP and UM Call Routing. In Exchange 2013 all clients communicate via RPC over HTTPS, no RPC traffic from client to server is required. RPC is now handled solely within the Mailbox Server Role.
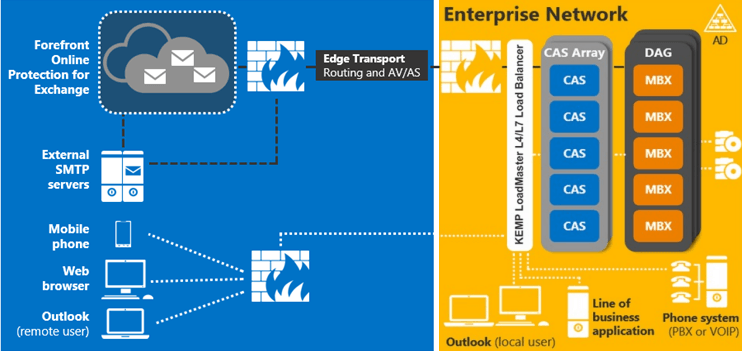
Mailbox Server Role: In Exchange 2010, the Mailbox server role hosted both mailbox and public folder databases and also provided email message storage. Now, in Exchange Server 2013, the Mailbox server role also includes the Client Access protocols, Transport service, mailbox databases, and Unified Messaging components. One of the drivers behind this new architecture is that more Roles can be combined within a single server requiring less server Roles that are deployed while having greater hardware utilization. Additionally when the two Roles are combined they can communicate internally using RPC thus eliminating the need to support the RPC protocol outside of a single Server Role. Note the screen shot below.

Figure 1: New Server Role architecture
Given the new architecture, the Client Access Server performs its role in a different manner than it did in Exchange 2010 by acting as a proxy for connections passing through it. This offers a more simplified deployment for three reasons:
- Connections are now stateless; the Client Access Server Role only proxies, authenticates and redirects connections but all rendering takes place at the Mailbox Server level. This means that if a Client Access Server were to fail there is no problem in forwarding the session to another Client Access Server because there is no session affinity to maintain. This means that load balancing for Exchange 2013 can be performed at Layer 4 though there still many benefits to load balancing at Layer 7 as detailed later.
All communication now takes place over https and RPC-over-TCP a.k.a. MAPI has been done away with. The many Exchange roles and responsibilities have been consolidated. As an example, the Client Access Server Role is also now responsible for SMTP connections. The sole service responsible for that is the Frontend Transport services which does all the SMTP related functionality including recipient/sender filtering, protocol logging…etc. Regarding the Edge Transport Role, there is no Edge Server 2013 specific version so you can use the Exchange 2010 Edge Transport Server along with your Exchange server 2013 deployment, there might be a change in this regard in later service packs.
Managed Availability is built into both Server Roles in Exchange 2013. It includes three main asynchronous components. The first component is the probe engine. The probe engine’s responsibility is to take measurements on the server. This flows into the second component, which is the monitor. The monitor contains the business logic that encodes what is considered to be healthy. It is very much a pattern recognition engine; it’s looking for unique patterns contained in the different measurements taken from Exchange 2013 and then making a decision on whether the component is considered healthy or not. Finally, there is the responder engine. When a component is determined to be unhealthy its first action is to attempt to recover that component. Managed Availability provides multi-stage recovery actions: the 1st attempt might be to restart the application pool, the 2nd attempt might be to restart a service, the 3rd attempt might be to restart the server and the 4th and final attempt may be to offline the server so that it no longer accepts traffic. If all of these attempts fail, managed availability then escalates the issue to an administrator through event log notification. At this point on the Load Balancer, it continues to mark this server/service/application as down or unhealthy. Each server is capable of executing its own probes, monitors itself, takes action to self-recover, and of course, escalates if needed.
So the new built-in Managed Availability features aid in the Load Balancers decision process to make more intelligent, granular, decisive, and definitive decisions when it comes to an application, service, or server being up or down.
Kemp and Exchange 2013
Load Balancing Exchange 2013
With Exchange 2010, configuration on a Kemp Load Balancer was quite simply and easily accomplished. Whether you opted to use the Exchange templates provided by Kemp, or perform the configuration manually, there was only a requirement for at least two distinct virtual services: one for RPC/MAPI (all ports or configured static ports), one for HTTPS (443), and optionally one used as a redirection for HTTP (80) requests to HTTPS (443). Other services such as SMTP (25), IMAP and POP could also be added to the configuration but were not required for Exchange 2010 to function. Note the following screen shot demonstrating the configuration after all has been accomplished.

Figure 2: Kemp LoadMaster Exchange 2010 Configuration
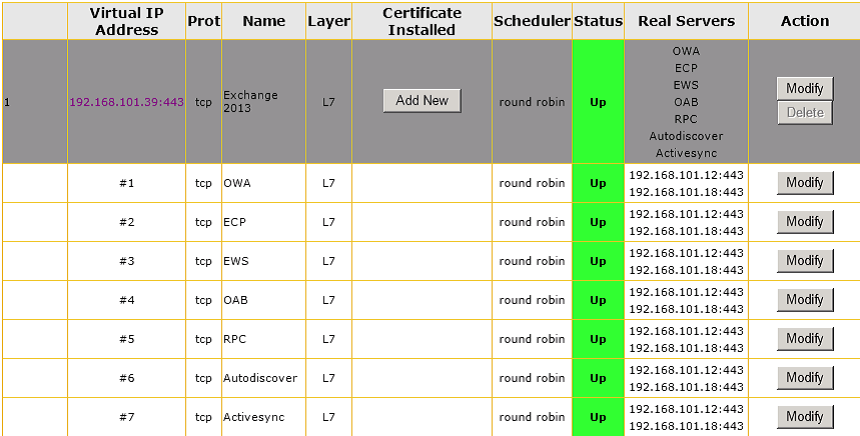
Given the new architectural changes in Exchange 2013, the minimum requirement for Load Balancing Exchange 2013 traffic is to configure one Layer 4 Virtual Service for traffic coming in for HTTPS (443) with no persistence, basic Round Robin load balancing intelligence and that completes the setup. This is depicted in Figure 3. However, in order to perform health checking for individual Exchange 2013 web services and to take advantage of intelligent features that help optimize the deployment Layer 7 load balancing is required. In this regard, Kemp provides the ability to create Sub Virtual Services that branch off of a parent Virtual Service on a given IP address and port. Since we are checking the health of individual Exchange 2013 web services, the root or parent Virtual Service automatically switches to a Layer 7 Virtual Service. A view of the final configuration when setting up a parent Virtual Service for port (443) and child Virtual Services for Outlook Web App, Exchange Administration Center, Exchange Web Services, and other services is shown in Figure 7 in the Reverse Proxy/Edge Security Pack section.

Figure 3: Kemp LoadMaster Exchange 2013 Configuration
It is important to understand that even though Exchange 2013 can be load balanced at Layer 4 because of the built-in intelligence added into Exchange 2013 such as Managed Availability, to take full advantage of an intelligent load balancer and the realize many of the added benefits, Layer 7 is still often required. These Exchange 2013 enhancements do not remove the need for health checking on the Load Balancer but work in concert to facilitate automatic removal of servers that fail the health check, selective service disablement and automatic recovery if Exchange 2013 internally has been able to correct the issue and bring the server/service/application back online.
Kemp, Reverse Proxy and ESP
Reverse Proxy for Exchange 2013
As with Exchange 2010 Exchange 2013 environments also benefit from utilizing a Reverse Proxy solution. One noticeable change that has occurred in the marketplace in this regard is that, as of December 2012, Microsoft brought the sale of their widely used Reverse Proxy solution, Forefront Threat Management Gateway (TMG) to an end.
A Reverse Proxy provides a few security benefits in Exchange 2013. Though not commonly known, a Load Balancer in and of itself, IS a Reverse Proxy. In fact, that is one of its primary benefits. Kemp Technologies has taken this a step further by adding additional Reverse Proxy capabilities by the introduction of the Edge Security Pack (ESP) which allows for pre-authentication of traffic between external clients and the Exchange 2013 Client Access Server along with Single Sign-On. ESP securely authenticates to the Active Directory domain the client’s request before that request is allowed to be passed on to the Exchange 2013 environment. This provides an additional layer of security between any external client and the internal network.
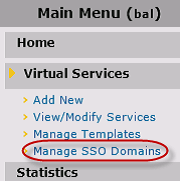
Configuration of the Edge Security Pack keeps with the model of simplicity of the previous scenarios and is very easy to setup. It does require that SSL acceleration be enabled and this means that SSL certificates(s) must be installed on to the Load Balancer. After this action is completed, adding Single Sign-On domain(s) to allow for pre-authentication of traffic can be completed. This is done in just a few steps by providing the domain name (Figure 5), address(es) for the LDAP servers used for client authentication, and choosing the method of communication used between LoadMaster and the Active Directory environment as seen in Figure 6.

Figure 4: Adding a Single Sign-On domain(s)
 Figure 5: Configuring the Domain name(s)

Figure 6: Adding address(es) for each of the LDAP servers that are used for client authentication
After that, the next requirement for setup is to create content matching rules to direct traffic to the appropriate Sub Virtual services and by extension, Exchange directories. The below table can be used as a guide for these rules when setting ESP and advanced health checking for use with Exchange 2013. The content matching rules will help identify virtual directories in a URL that a user is attempting to access such as /owa, /ecp etc.
| Name | Match Type | Options | Pattern |
|---|---|---|---|
| Auth_Proxy | RegEx | Ignore Case | ^/lm_auth_proxy* |
| activesync | RegEx | Ignore Case | ^/Microsoft-Server-Activesync* |
| autodiscover | RegEx | Ignore Case | ^/autodiscover* |
| Ecp | RegEx | Ignore Case | ^/ecp* |
| Ews | RegEx | Ignore Case | ^/ews* |
| Oab | RegEx | Ignore Case | ^/oab* |
| Owa | RegEx | Ignore Case | ^/owa* |
| Rpc | RegEx | Ignore Case | ^/rpc* |
Table 1: Kemp LoadMaster Edge Security Pack Content Matching Rule configuration
Following completion of the content rules, the remaining steps involve creating one parent Virtual Service and (7) child Sub Virtual Services that are configured to operate at Layer 7, with Transparency disabled and SSL acceleration enabled. Please note that ESP does not get enabled in the parent Virtual Service but gets enabled in each child Sub Virtual Service.
Once the configuration has been completed, it should look similar to what is shown in Figure 7.

Figure 7: Kemp LoadMaster Edge Security Pack Virtual Services configuration
Kemp LoadMaster provides the ability for ease of configuration for both Exchange 2010 andExchange 2013. The Edge Security Pack provides a way for end users connecting from the Internet to pre-authenticate on the LoadMaster prior to accessing any Exchange 2013 services as well as benefit from a Single Sign-On experience across virtual services. These innovations help to optimize any Exchange 2013 environment from the simplest to the most complex. More details on Exchange 2013 LoadMaster deployment and all of these great features can be found on the Kemp home page at http://www.kemptechnologies.com
