As you know we have some very smart folks here at KEMP. Here’s the second of his series from Bhargav Shukla on setting up and Load Balancing Office Web Apps Server 2013 farm. Originally posted on his blog.
In my previous post, I showed how to create an Office Web Apps Server 2013 farm.
Since I can’t leave you hanging, I am going to show you the next step of setting up a load balancer for the same. I assume you have created DNS entry for owaps.contoso.com and pointed it to virtual service you are about to create on your load balancer. Of course, I am going to show only KEMP load balancer setup, but I trust your intelligence and ability to translate this for other load balancer you may be using. Although, why would you ever use another load balancer? ![]()
First Things First
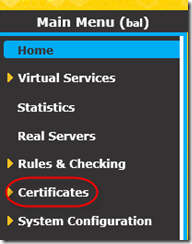
First step is to import the certificate that you created earlier before creation of farm. I am assuming you have logged on to To import the certificate, click on ‘Certificates’ menu:
Then on SSL Certificates and Import Certificate.
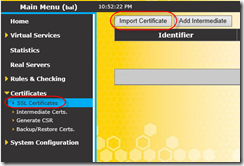
Provide the certificate file you exported including private key (it has to be the cert with private key) and relevant information:

Click save and that would be it for the certificate. If your certificate is from intermediate authority, you may need to add intermediate from SSL Certificates section above.
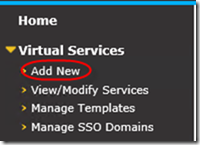
Now that the certificate is in place, let’s go ahead and create the Virtual Service (VS) that will serve clients. From Virtual Services, Click ‘Add New’.
The service is going to run on Port 443, so here’s what the first screen would look like:
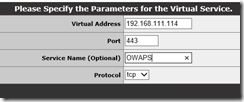
Make sure you substitute Virtual Address with correct IP address in your environment. Click ‘Add this Virtual Service’ and you will be presented with configuration screen:
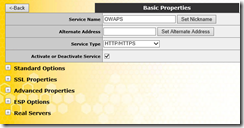
Let me walk you through each section. Let’s start with ‘Standard Options’ first:
Standard Options
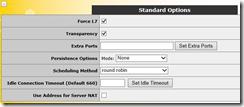
I am not going to cover what each option means, as that is actually a series of posts in works. And it can sidetrack us for good if I start explaining them here. So let’s stay focused. First two check boxes are going to make your VS ‘transparent’. It means that the servers will “see” client IP address in source IP headers. This is ok if you are allowing Office Web App Servers to connect to clients directly. This also means that you will need to either configure your server for Direct Server Return (DSR) or you will have to use Load Balancer as default gateway. Last note, we aren’t talking only internal clients, you will have clients connecting from internet. Depending on your topology, it might be best to “hide” client IP from servers and simplifying packet flow for load balancing. In my case, I am not worried about looking at client IP in logs. My servers will not have internet access. So I can’t use transparency. I will uncheck that box.
The next, important stop is persistence. Load balancer requirements for Office Web Apps Server, states client affinity as a requirement. It does not state any particular way of doing it. We can do it many different ways, but I recommend using ‘SuperHTTP and Source IP’. This option isn’t going to be visible in drop down just yet. And that is because we haven’t enabled SSL decryption on the VS. It is a little detour but let’s take it and we will come back to this.
SSL Properties
As you would notice, SSL Properties has only one option – SSL Acceleration and it’s not enabled. Let’s go ahead and enable it. It’s normal to see the message about self signed certificate. This is because we haven’t assigned valid certificate yet. We can only do that after enabling decryption. Once acceleration is enabled, you will notice a few more options. There are two important actions for us here. First is to enable encryption back to servers, and second is to assign valid certificate that we imported earlier.
Clicking ‘Reencrypt’ check box takes care of first requirement. Now we will be sending traffic to Office Web Apps Servers over SSL. That’s what the servers are expecting as per our configuration when we set up the farm.
To add valid certificate to the VS, let’s go ahead and click ‘Add New’:

This will bring you to familiar ‘Manage Certificates’ section. However, there are few more options now, next to the certificate we imported earlier:

You will notice ‘VS to Add’ drop down now has a service the certificate can be assigned to. Let’s select the VS we just created and click ‘Add VS’.
Now go back to the VS and let’s continue our discussion on Standard Options.
Standard Options Continued…
Now that SSL acceleration is enabled, load balancer gains visibility into the packets coming over SSL channel from client. We are now real Layer 7 load balancer. Don’t ask what ‘Force L7’ means. I will cover it in future post in detail. Focus.
So let’s go ahead and select ‘SuperHTTP and Source IP’ for persistence. SuperHTTP is unique to KEMP. We use multiple sources of information from HTTP stream to identify each client as unique. This is critical if you want to make sure you distribute traffic to multiple real servers efficiently. Source IP is not best especially since NAT is used everywhere nowadays and it’s highly possible you may have clients such as mobile tablets etc. coming from behind NAT. They would show up as one client and would all be persisted to single real server resulting in unbalanced distribution.
Persistence timeout is the time when load balancer will determine if the client can be sent to another server. In absence of timeout information from Microsoft, I would suggest to keep it longer than longest session you expect to have from a given client. I think 30 minutes might be good but I will leave it upto you to decide.
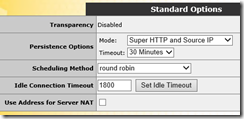
I will leave scheduling method to default ‘round robin’. Scheduling method allows you to chose how to distribute connections between available servers. Round robin in its simplest form doesn’t consider any factors except number of servers to distribute connections to. For production deployments I would recommend evaluating which method would be best for you. i.e. least connection will allow you to distribute connections using number of connections for a given server as a measure. Resource based option allows you to monitor your server using a light weight agent and make decision based on resources such as CPU, Memory or other performance counters to decide optimal server for next connection. Pick your poison or go with default if unsure.
Idle connection timeout is obvious. When to drop a connection that is idle. I tend to choose 1800 seconds in my setup in absence of guidance from Microsoft. Pick a number you are confortable with. Understand that longer your timeout, longer it will take for load balancer to clean up connections that doesn’t need to take up resources on load balancer. Oh, and make sure you click that little button next to it to commit the change.
Let’s not worry about ‘Use Address for Server NAT’ for now. It might be needed in unique NAT situations, especially when the IP address used for NAT matters to the clients connecting to the service. Again, topic for another day.
Skip over ‘Advanced Properties’ and ‘ESP Options’ as none of that is needed here. You may not see ‘ESP Options’ if you are not running firmware 7.0-4 or higher with ESP license.
This brings us to the final section: ‘Real Servers’
Real Servers
This is where you define two most critical pieces for load balancing given workload: the actual servers and how to make sure they are healthy. Let’s configure them.

In previous post, when we configured the farm, we checked http://localhost/hosting/discovery to make sure the service was configured correctly. We are going to use the same logic for health check in the VS. YOu will notice ‘HTTPS Protocol’ is automatically selected since it is a service listening on TCP port 443. You don’t need to specify ‘Checked port’. The URL is relative so you don’t need to specify hostname. Which leaves us with ‘/hosting/discovery’. Go ahead and put it in. MAke sure you clieck ‘Set URL’ to commit the change.
Now here’s the decision point. HTTP Method allows you to decide what the response should be. We aren’t after specific string in response, but I feel more confortable getting response ‘200 OK’. For that, I need to send http ‘GET’ to the server instead of default ‘HEAD’. You will notice that in the screenshot above. Nothing else needs to be changed here.
Once the health check is configured, only thing missing is actual servers. Go ahead and click ‘Add New…’ button, which will bring you to real server screen:

Here I would only provide IP address of real server. Nothing else needs to be changed unless you want to prefer one server over other using weight or want to limit how many connection given server should be limited to.
Add all Office Web Apps Servers in the farm and you have completed required configuration. The service should be ready to go. You can check that from Virtual services screen. Just click on ‘View/Modify Services’ and you should see a list of your configured VS, including the one we just configured. If it’s status is ‘UP’, you’re all done.

Now you should be able to get to the published, load balanced service from client and for this post, we are going to simply open browser, go to https://owaps.contoso.com/hosting/discovery and make sure it renders the XML as expected.

And that’s how you load balance Office Web Apps Server 2013 farm. Capisce?
 About Bhargav Shukla
Director – Product Research and Innovation at KEMP Technologies, Exchange/Lync 2010 MCM, Microsoft Certified Trainer
Bhargav is one of very few people in the world to hold the prestigious dual Microsoft Certified Master certification for Microsoft Exchange 2010 and Lync 2010. His deep experience in enterprise technologies and Microsoft platforms has enabled him to serve on the board of Microsoft Certified Architects for Exchange 2010, the Judges Panel for PowerShell scripting games and to speak at TechEd 2011, TechEd 2012 and other major events.

