How To Use Progress Kemp LoadMaster for Oracle Cloud Infrastructure (OCI)

Oracle Cloud Infrastructure (OCI) is a cloud computing service offered by Oracle Corporation providing servers, storage, network, applications, and services through a global network of Oracle’s managed data centers. The company allows these services to be provisioned on-demand over the internet.
OCI customers can now use Progress Kemp LoadMaster for enhanced load balancing that offers additional security features and advanced load balancing capabilities in an easily managed solution.
Compared to OCI Flexible Load Balancer and OCI Flexible Network Load Balancer, LoadMaster makes it easy to provide the best performance and security for your applications and simplifies operation with management using a web interface or using an Application Programming Interface (API).
The LoadMaster features:
- Web Application Firewall (WAF) to protect against cyberattacks
- Pre-authentication and Single Sign-On (SSO) of users
- Advanced health-checking for better detection of server outages
- Content rules for intelligent traffic management and control
- Advanced session persistence and load balancing options, including cookies
- Support for multiple digital certificates and Server Name Indication (SNI)
- Pre-define application templates for quick setup
- Choice of web interface for API for easy management
Prerequisites
Before attempting the steps in this document, you are required to meet the following prerequisites and configurations:
- You must have an OCI account.
- You must upload the LoadMaster private image to the OCI Object Storage bucket.
- You must have access to the relevant Virtual Cloud Networks (VCNs) and subnets.
- You must configure a Network Security Group (NSG) specifying the relevant ports and protocols. Kemp recommends having:
- A TCP rule for port 8443 for Web User Interface (WUI) access
- TCP rules for ports 80, 443 and other ports for virtual server configurations, as needed
- A UPD rule for port 53 (for DNS)
- An SSH rule for port 22 Global Balancing (GSLB) synchronization
- You must configure a Public IP address (PIP)
- For a single LoadMaster with a Public IP address (PIP), if you want more than one Virtual Service IP address, you need multiple PIPs. You cannot bind PIPs to Virtual Services, only to Network Interface Cards (NICs), so the LoadMaster needs multiple NICs.
Deploying a LoadMaster in the Oracle Cloud Infrastructure Platform
To deploy a LoadMaster in the OCI platform, follow the steps outlined below:
- Log in to the relevant Oracle Cloud Infrastructure workspace.
- Select Storage from the menu.
- Click Object Storage and Archive Storage.
- Click Create Bucket.
- Fill in the Bucket Name and click Create.
- Select the newly created bucket.
- Click Upload.
- Fill in the Object Name Prefix. Drag and drop the LoadMaster image file or select files to browse for the image file and click upload.
- Select Compute, Instances, and Custom Images.
- Type the Name of the custom image. Select Linux for the Operating System. Select Import from an Object Storage Bucket. Select the correct Bucket. Select the Object Name and choose QCOW2 for the Image Type and click Import Image.
- Click Create Instance.
- Type Name for compute instance.
- Click Change image.
- Select Custom Images from Image Source and choose Custom Image Name. Click Select Image.
- Click Change Shape.
- Click Specialty and Previous Generation for Shape Series Type.
- Select VM.Standard1.2 for Shape Name (LoadMaster requires minimum 2xOCPU and 2GB Memory).
- Select Existing Virtual Cloud Network or Create New Virtual Cloud Network.
- Select Existing Subnet or Create New Public Subnet.
- Select Assign a Public IPv4 Address.
- Select Generate a Key Pair for Me or another option and click Save Private Key.
- Click Create.
- Click the hyperlink for the newly created instance.
- Click Start to initialize the LoadMaster instance.
- The State change to Running when the LoadMaster is created successfully and has started.
- Access the LoadMaster using the Public IP (PIP) by entering https://<PIP>:84343 in the address bar of your browser.
To license the LoadMaster appliance via the referenced form, please use your Progress ID to generate a temporary license. The temporary license is a fully featured license that will allow you to test all of the features and functionality of the LoadMaster appliance. If you do not have a Progress ID, please create a new Progress ID here.
Shutting Down the LoadMaster
There are two ways to shut down the LoadMaster: 1) using the OCI UI or 2) using the LoadMaster UI.
Shut Down Using OCI UI
- Log in to the relevant Oracle Cloud Infrastructure workspace.
- Select Compute and Instances.
- Click the Name/ID of the LoadMaster to shut down.
- Click Stop.
- Select Force stop the instance by immediately powering off.
- Click Force stop instance.
Shut Down Using the LoadMaster UI
- Log in to the LoadMaster UI using the Public IP (PIP) by entering https://<PIP>:8443 in the address bar of your browser.
- Go to System Configuration > System Administration > System Reboot.
- Click Shutdown.
Active/Standby and Active/Active GSLB Availability Modes
Global Server Load Balancing (GSLB) will be deployed as a feature on the LoadMasters to enable both Active/Standby (AS) and Active/Active (AA) availability modes. For High Availability in OCI, GSLB is the feature which will be leveraged to provide this functionality. Traditional High Availability (HA) will not be used in OCI.
Additionally, each respective LoadMaster appliance can be configured with a single network interface (NIC) or with multiple network interfaces. Multiple network interfaces require additional IP subnets to be configured in OCI and added to the LoadMaster appliance. Multiple NIC’s enable subnet segmentation of frontend client traffic and backend server/application traffic. Use of multiple NICs are sometimes required to satisfy a security requirement based on a particular company’s security posture.
Multiple NIC’s are not required for the LoadMaster. AA or AS will be configured per Fully Qualified Domain Name (FQDN). Multiple LoadMaster appliances will be partnered as a logical cluster to proxy and/or load balance traffic to the servers’ hosting applications. The following diagrams (Fig 1 & Fig 2) illustrate an Active/Standby and an Active/Active configuration.
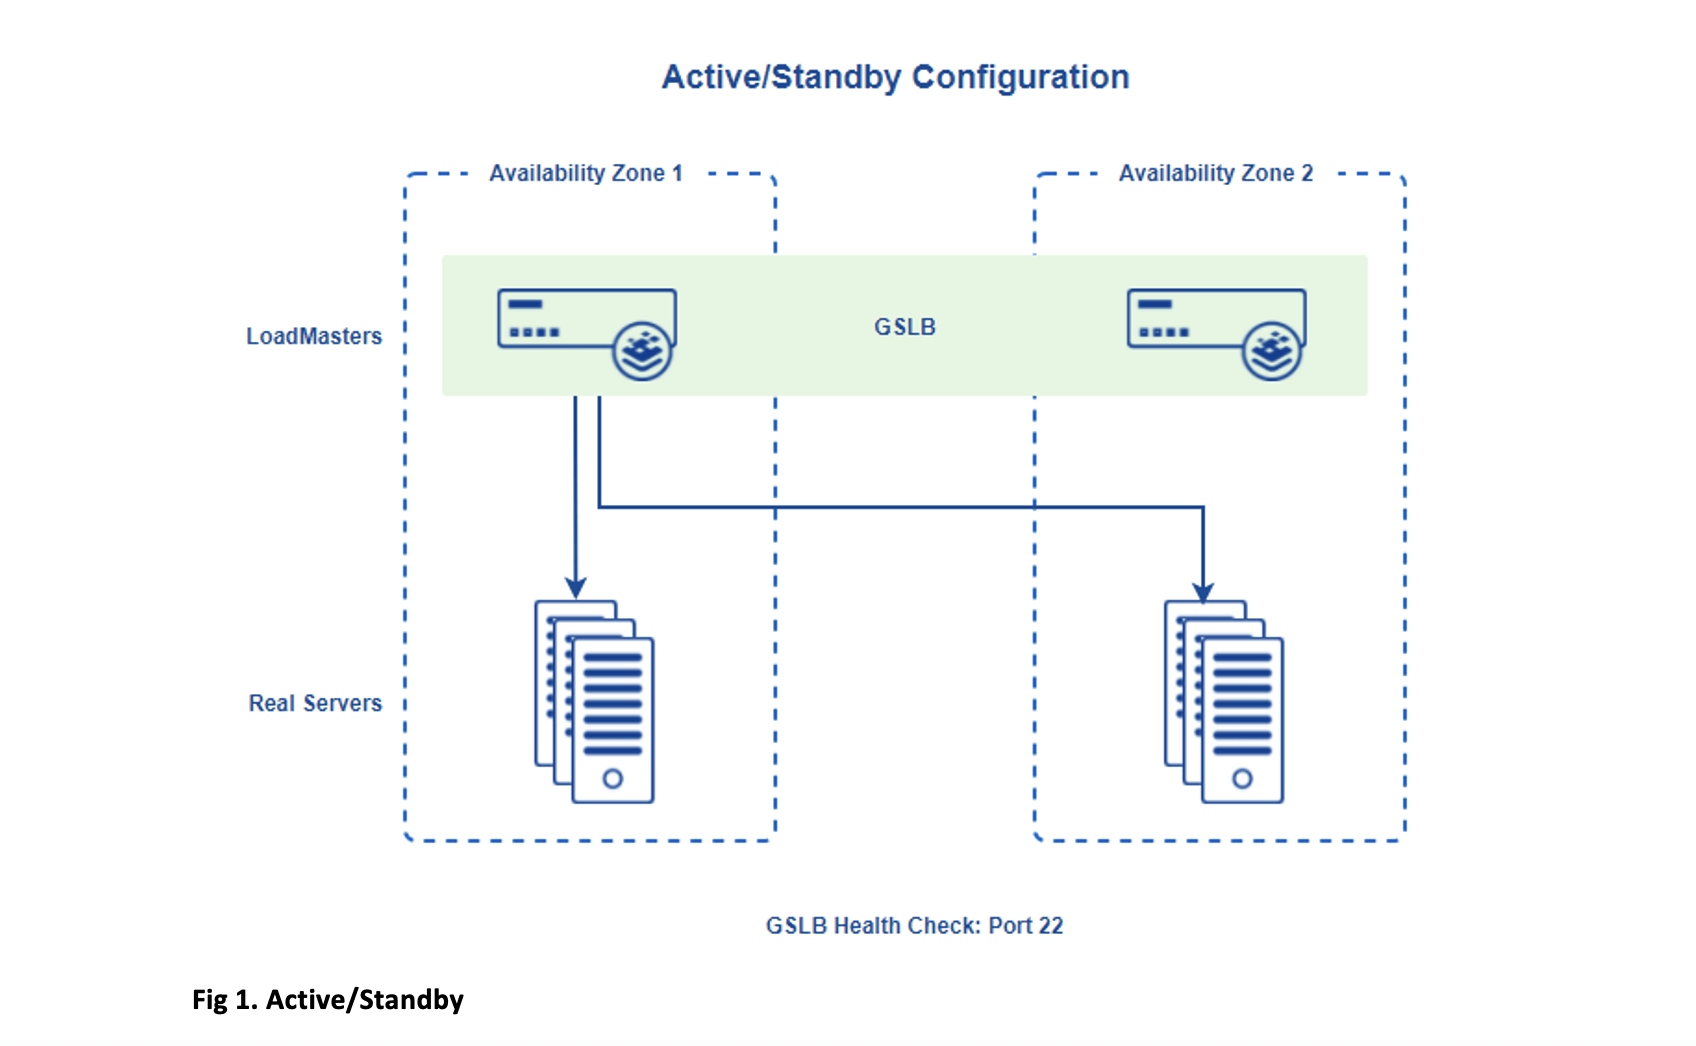
Diagram illustrates an Active/Standby configuration.
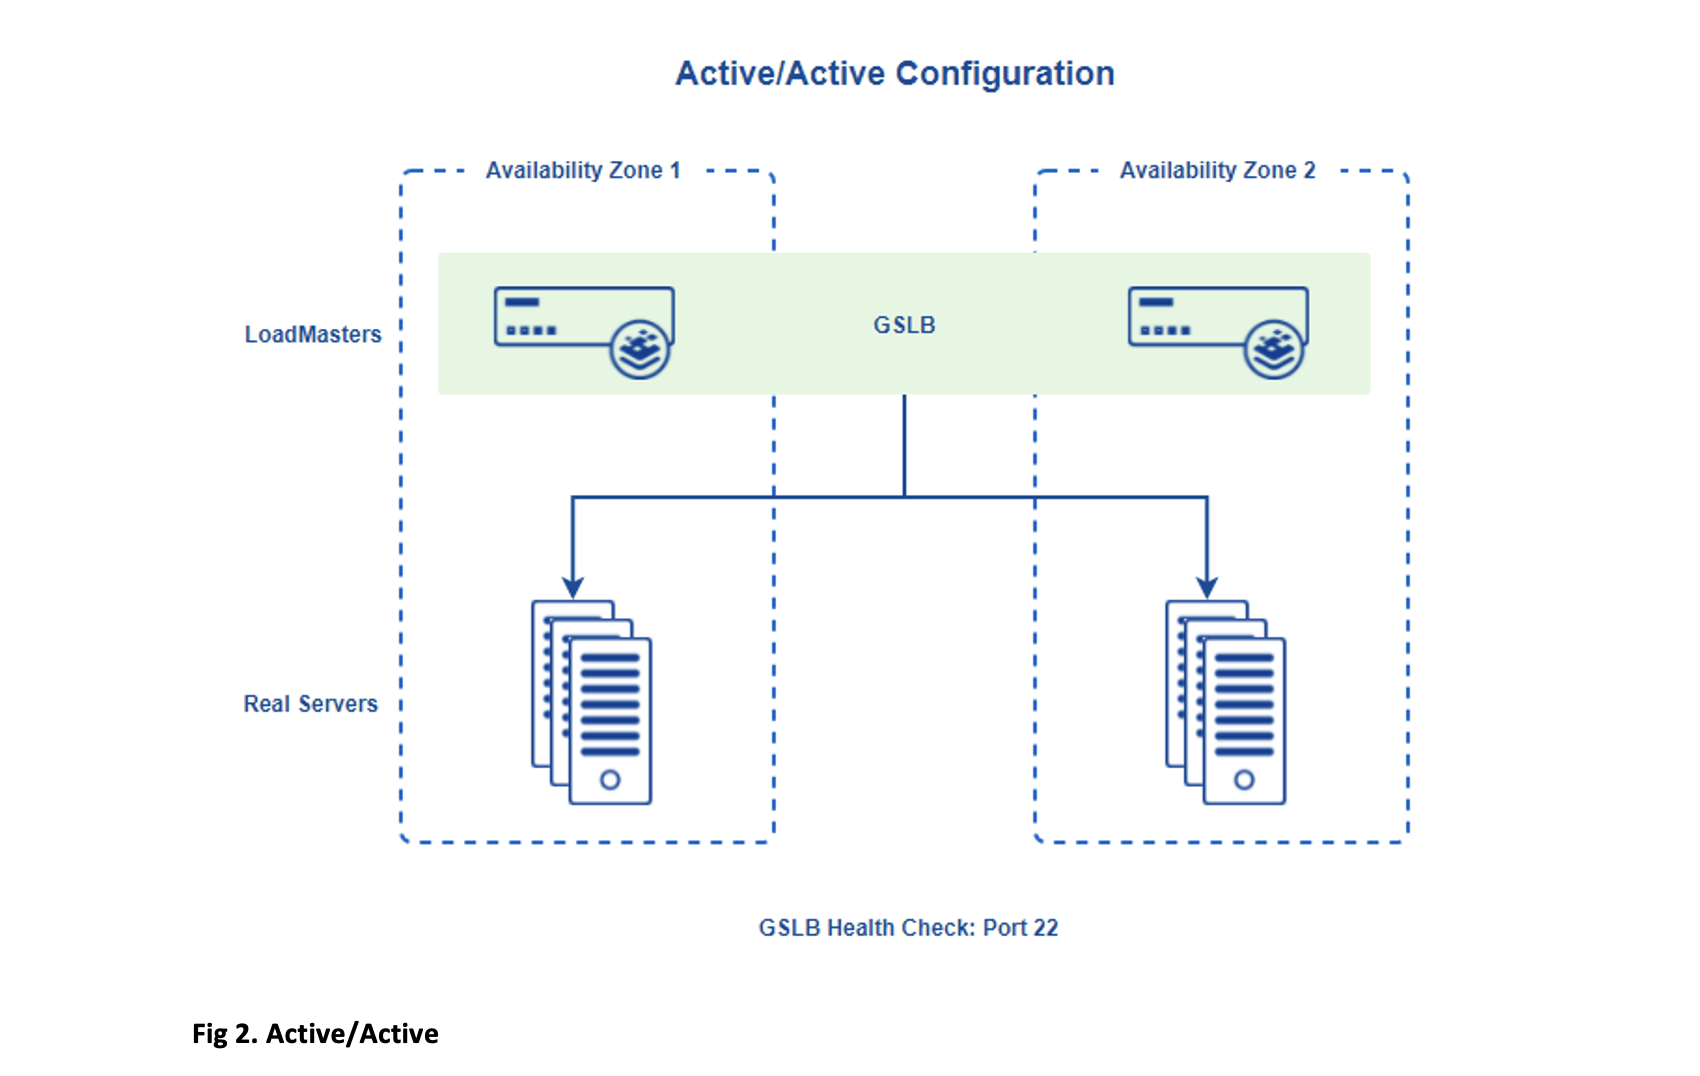
Diagram illustrates an Active/Active configuration.
To set up an Active/Active or Active/Standby service mode for an application, you must first configure the LoadMaster appliances as partners in a logical GSLB cluster. Once the LoadMasters are successfully partnered, the Global Balancing (GSLB) feature of the LoadMasters is configured per FQDN as AA or AS. The authoritative DNS server for the respective zone will be configured to delegate FQDNs to the LoadMasters to act as the response authority for the delegated FQDNs.
For detail on configuring the authoritative DNS server for FQDN delegation, please refer to section 4.9 DNS Integration/Delegation in the GEO-Feature Description document.
Configure the LoadMasters
To set up LoadMasters as GSLB partners, follow the steps below:
- Deploy and license both LoadMasters following the steps in the Deploy a LoadMaster in the Oracle Cloud Infrastructure Platform.
- Log in to the LoadMaster UI using the Public IP (PIP) by entering https://<PIP>:8443 in the address bar of your browser.
- In the main menu, go to Certificates & Security > Remote Access.
- Enter the internal IP address of the partner LoadMaster unit in the GEO LoadMaster Partners text box and click Set GEO LoadMaster Partners.
- Repeat the configuration in Step 4 for other LoadMaster units.
The two LoadMaster appliances will pair as partners over port 22, reflecting a green checkmark for a successful Partner Status.
- In the main menu, go to Global Balancing > Manage FQDNs.
- Enter desired text in Add a FQDN and click Add FQDN.
- Enter IP addresses in the Add a new IP address and click Add Address.
- Choose Round Robin in Selection Criteria for an Active/Active availability mode.
- Choose Fixed Weighting in Selection Criteria for an Active/Standby availability mode.
- Modify the Weight of the IP address that will be configured for Standby.
A higher Weight value indicates preference. In the case of the previous example, request to FQDN app.domain.com will be forwarded to IP address 10.0.0.196. Only during failure of the application at server IP address 10.0.0.196, or if the LoadMaster administrator disables that IP address endpoint for server maintenance, will traffic be forwarded to IP address 10.0.0.117. There are numerous configuration options to fine tune how traffic can be handled via the GSLB feature.
Further Help with Oracle Cloud Infrastructure
Further Help with LoadMaster

Andy Redman
Andy Reman is the Director of Solutions Engineering (Americas) at Progress. Andy is a technology evangelist and focuses on translating technology and solutions into business needs and values. Andy has over 30 years of experience in technology, designing and building some of the largest networks in the Americas. He is passionate about open source software, contributing to various forums and community groups. With his present role at Progress, he leads a team of Solution Architects focused on giving customers a forensic lens into their network traffic to assist leaders in making wise decisions about cyber security and performance-related issues. His team also enables customers to realize a brilliant application experience through creative solutions.
more from the authorRelated tags
Explore more articles
Kemp is part of the Progress product portfolio. Progress is the leading provider of application development and digital experience technologies.
Copyright © 2026 Progress Software Corporation and/or its subsidiaries or affiliates. All Rights Reserved.
Progress and certain product names used herein are trademarks or registered trademarks of Progress Software Corporation and/or one of its subsidiaries or affiliates in the U.S. and/or other countries. See Trademarks for appropriate markings. All rights in any other trademarks contained herein are reserved by their respective owners and their inclusion does not imply an endorsement, affiliation, or sponsorship as between Progress and the respective owners.