
The OWASP CRS are more generic in nature than a commercial ruleset and cover a much larger set of applications from a broader attack surface. This means that the CRS protects you from generic attacks rather than individual specific known exploits. For example, there are not rules for all known SQL injections attacks but a small set of rules protecting your application from any attack that looks like an SQL injection attack. This provides significantly enhanced coverage for Zero Day and other unknown attacks.
Once the WAF is enabled on the LoadMaster, we can check it working immediately using:
curl http://<<Virtual Services IP Address>>/index.html?exec=/bin/bash
The query string contains an attempt to exploit an imaginary backend. This exploit won’t work of course, but it is enough to trigger CRS. The request is not blocked immediately though. Don’t worry, in this blog, we’ll explain both the settings and how to get that request to block.
The LoadMaster logs of most interest here is the WAF Event Log File under System Configuration –Logging Options -System Log Files. The log generated from this access attempt is shown here:
2021-04-18T21:40:43+00:00 lb100 wafd: [client 10.0.31.231] ModSecurity: Warning. Matched phrase "bin/bash" at ARGS:exec. [file "/tmp/waf/3/REQUEST-932-APPLICATION-ATTACK-RCE.conf"] [line "500"] [id "932160"] [msg "Remote Command Execution: Unix Shell Code Found"] [data "Matched Data: bin/bash found within ARGS:exec: /bin/bash"] [severity "CRITICAL"] [ver "OWASP_CRS/3.3.0"] [tag "application-multi"] [tag "language-shell"] [tag "platform-unix"] [tag "attack-rce"] [tag "paranoia-level/1"] [tag "OWASP_CRS"] [tag "capec/1000/152/248/88"] [tag "PCI/6.5.2"] [hostname "10.35.56.58"] [uri "/index.html"] [unique_id "e8035fe4-c980-49e8-b87a-6360afe9c44b"]
We are looking at several entries in this log
- id which tells us that rule 932160 was hit
- msg to learn what happened, in this case remote command execution, Unix Shell Code found
- hostname is the Virtual Service Address that the attack was triggered against
So, what we’ve learned is that rule set is active, and it is logging attacks, even if, for the moment, it is allowing those attacks to occur.
Before we dive into blocking this attack, let’s run through the WAF settings on the LoadMaster and their meanings.
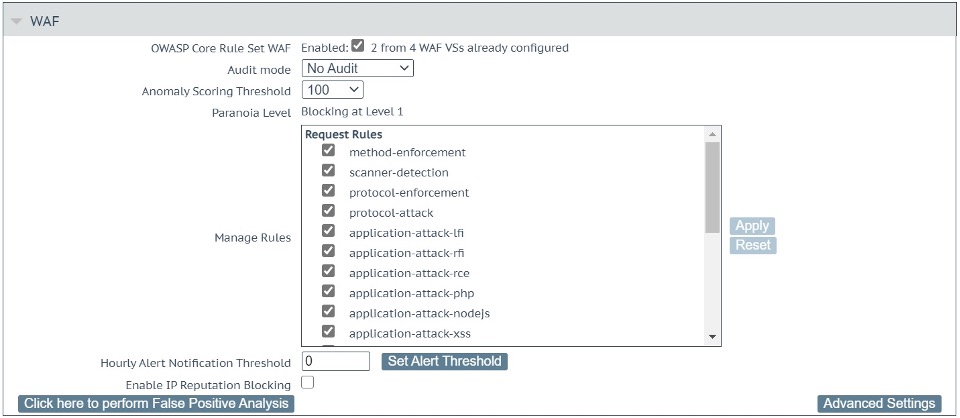
The main settings are shown in Figure 1 above and includes the following:
- Audit mode: This enables separate ModSecurity Audit and Debug Logs (System Configuration –Logging Options –Extended Log files– WAF Audit Logs or System Configuration –Logging Options –System Log Files – WAF Debug Log File), that are verbose: You can use it to log the entire traffic in an out of LoadMaster through the WAF. This can fill up your disk space fast. That’s why the default is No Audit. Setting to Audit All logs every request which would be useful for detailed debugging, Audit Relevant will log those requests that trigger CRS rule alerts and those requests that have a HTTP status code indicating an error.
What is specifically logged to these files is controlled under Advanced Settings – Audit Parts which is described below.
- Anomaly Scoring Threshold: This is the key setting. Every detection rule in CRS raises the anomaly score. Most rules add a score of 5 and when the threshold is reached, the request is being blocked. The default Anomaly Scoring Threshold on LoadMaster is 100. So, an attacker would need to trigger 20 rules to be blocked. This is rare, yet it is also rare for a benign user of any application to trigger that many rules. So, this default setting is relatively safe for starters. Still, I have seen web applications exhibiting a behavior that had normal users reach far higher anomaly scoring values. That’s why I personally set this value to 10,000 first until I have a good feeling for the Virtual Service at hand. And then I lower it gradually while weeding out the false positive alarms.
- Paranoia Level: This is an informational placeholder. This is configured under Advanced Settings which is dealt with below. This information is important since a higher Paranoia Level means more false positives. And that in return means a higher anomaly score until you have tuned the false positives away.
- Manage Rules: CRS rules are organized in groups and this list gives you the option to enable and disable groups of rules as well as individual rules. Click on the name of a group to expand the view to individual rules in each group. You can then enable or disable the individual rules.
Almost all rule groups are enabled by default. Yet, when you scroll down Manage Rules, you come across a section titled Workloads. These are groups that facilitate working with these well-known applications. What they do is they anticipate the behavior of the software and prevent certain rules from being applied, since they would trigger a false positive.
Take Drupal for example: Drupal submits a lot of parameters with square brackets in the parameter name (e.g., id [0]). Once a certain number of square brackets is encountered in a parameter, CRS triggers an alarm. Enabling the Drupal workload in this menu, makes these false alarms disappear without the need to tune them individually.
More information on the CRS rules is available here
- Hourly Alert Notification Threshold: The LoadMaster will send syslog notifications to a 3rd party syslog server or SIEM as vulnerabilities are detected. Here, we set the threshold before a syslog notification is sent.
- Enable IP Reputation Blocking: This setting allows access to updated reputation data is provided daily that allows blocking based on GEO IP information; this is the geographic location of the IP address of the HTTP client that is performing the request. This should be enabled under Web Application Firewall – Access Settings, where you can automatically configure the download and installation time for the updated reputation data.
- Click here to perform False Positive Analysis: This allows you to perform a false positive analysis for this specific Virtual Service to tune the WAF to your application. This is addressed in a separate blog, please stay tuned! ?
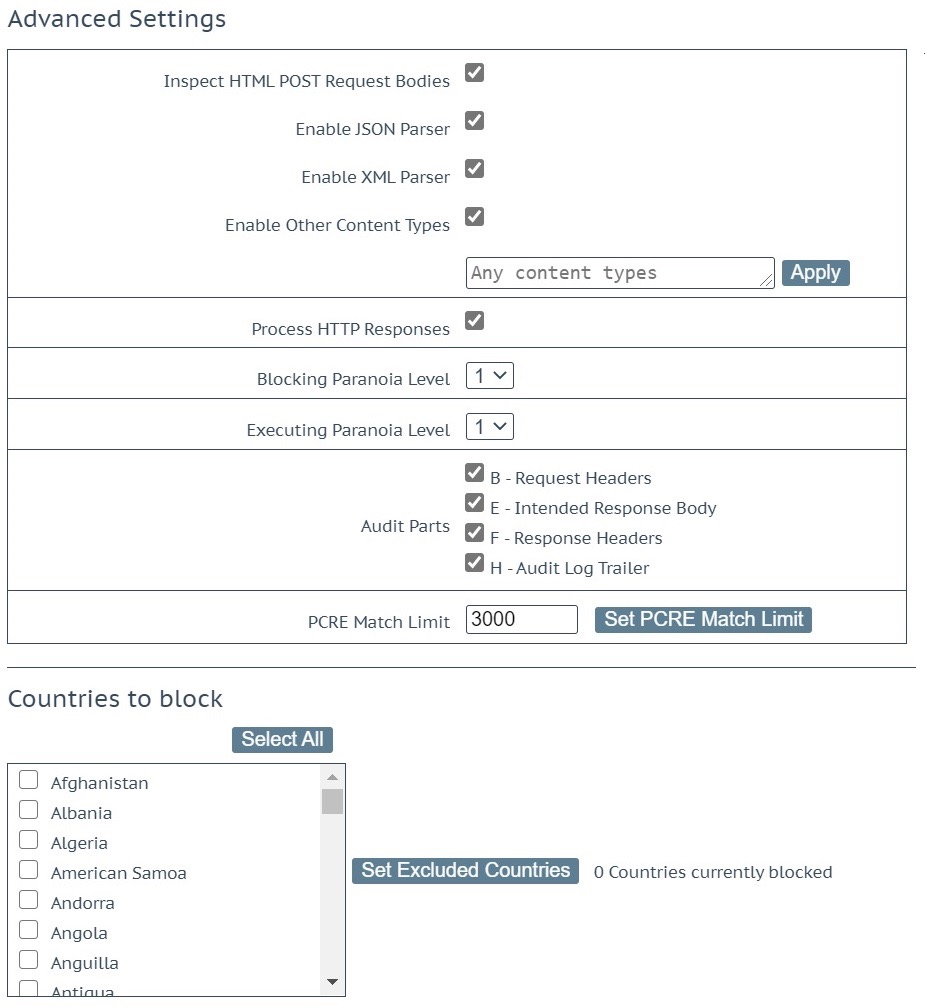
Next, let’s look at the Advanced Settings, as shown in Figure 2 below.
These are advanced settings and should be treated with care:
- Inspect HTML POST Request Bodies: This enables a series of options that are described as follows: The JSON and the XML parser as well as the option to have CRS inspect other Content Types. It is obvious you need the two parsers if you want to make any sense of JSON and XML. Otherwise, it’s simply an accumulation of special characters with sparse bits of information. But also, the third checkbox, “Enable Other Content Types“, is important. It makes sure that normal form submissions (Content Type “application/x-www-form-urlencoded”) are being inspected. You can then continue to enter the individual Content Types you want to have inspected, but it’s OK to leave the text box as is (“Any content types”) and the WAF will inspect the forms.
- Process HTTP Responses: CRS does 90% of its attack detection on the request and its body. But there are a decent group of rules targeting the response body.
- Blocking Paranoia Level: The default Paranoia Level is 1 and that’s good enough for most LoadMaster installations. However, when you want a stricter rule set and you are willing to tune more false alarms, then raising the Paranoia Level makes sense.
When you raise the Paranoia Level, it’s usually good enough to raise the so-called Blocking Paranoia Level. Setting this to Paranoia Level 2 enables the rules from Paranoia Level 2. They will now contribute to the scoring of the request and the WAF will then use that score to decide whether the request ought to be blocked or not.
- Executing Paranoia Level: You can use it to execute a higher Paranoia Level than the one you use for the scoring e.g., you execute on Paranoia Level 3, yet you only block on level 2. This allows you to peek into Paranoia Level 3 without blocking any legitimate users. That way you can tune away the false alarms of Paranoia Level 3 before you also raise the Blocking Paranoia Level to 3.
Please note that the user interface prevents you from setting a Blocking Paranoia Level that is higher than the Executing Paranoia Level. It’s obvious you cannot block on a higher level if you do not execute its rules.
Audit Parts: The checkboxes allow you control the level of detail in the Audit mode log files. These settings are fully detailed here.
- Header and FooterIn all cases, the audit log formats A (Audit Log Header) and Z (Audit Log Footer) are provided.
- Process RequestsIn the default configuration in processing requests, the audit log formats B (Request Headers) and H (Audit Log Trailer) are provided.
- Process ResponsesWhen Process HTTP Responses tickbox is checked, the additional (to all the above) audit log formats E(Intended Response Body) and F (Response Headers) are provided. Figure 2 above shows this configuration.PCRE Match Limit: This value that controls the behavior of the regular expression engine within ModSecurity. The default value is 3,000 which is conservative and may lead to a lot of PCRE error messages (“PCRE limits exceeded”). So, it makes sense to raise this value. Yet raising the value also augments the risk to fall victim to a so-called Regular Expression Denial of Service attack (“ReDoS”).Countries to block: This enables you to prevent IP addresses from individual countries from accessing your application.
Coming full circle to the initial test, I set the Anomaly Scoring Threshold to 5 and repeat the test. I get the following where the WAF blocks the request with a 403 error.
Request
curl http://<<Virtual Service IP Address>>/index.html\?exec\=/bin/bash
Response
<html><head><title>403 Forbidden</title></head><body>Access denied</body>
Logs
The LoadMaster logs of most interest here is the WAF Event Log File under System Configuration –Logging Options –System Log Files. The logs generated from this access attempt is shown here:
2021-04-18T22:46:28+00:00 lb100 wafd: [client 10.0.31.231] ModSecurity: Access denied with code 403 (phase 2). Operator GE matched 5 at TX:anomaly_score. [file "/tmp/waf/3/REQUEST-949-BLOCKING-EVALUATION.conf"] [line "93"] [id "949110"] [msg "Inbound Anomaly Score Exceeded (Total Score: 8)"] [severity "CRITICAL"] [ver "OWASP_CRS/3.3.0"] [tag "application-multi"] [tag "language-multi"] [tag "platform-multi"] [tag "attack-generic"] [hostname "10.35.56.58"] [uri "/index.html"] [unique_id "5a9a2689-8e75-4cff-baef-6245cff57c67"]
We are looking at several entries in this log
- id which tells us that rule 949110 was hit
- msg to learn what happened, in this case the Anomaly Score was exceeded
- hostname is the Virtual Service Address that the attack was triggered against
- Access Denied indicating that this access attempt was blocked with a 403 error
Summary
Now that we have introduced the basic elements of configuring the Core Rule Set on LoadMaster, next week we will demonstrate a practical example of using custom rules to create / customize your WAF configuration within LoadMaster for a specific application.
If you are currently looking at utilizing Web Application Firewall (WAF), make sure to check out theKemp WAF here…
Read the rest of the OWASP CRS Series
Part 1: Introduction to OWASP CRSPart 2: How do you run OWASP CRS on load master Part 3: Deploying custom rulesPart 4: False Positive AnalysisPart 5: Reporting
