Deploying custom rules on LoadMaster

Custom rules are where we tweak and refine our security configuration as part of the overall system tuning which is an integral part of an administrator’s role in security. This third part of the OWASP CRS series explains how to edit, upload, enable and observe custom rules in action on the LoadMaster. We’ll follow a simple 4-step process on the LoadMaster. Along the way, the corresponding API commands will be provided.
Step 1: Prepare a custom rules file
This is typically done locally on your personal computer. A good choice is vim (though any text editor will do), as the syntax highlighting for the ModSecurity rule syntax aids understanding.
For this blog, we will provision a whitelist aimed at protecting a login form. These rules will immediately block requests to unknown endpoints, submitting unknown parameters or parameters with the wrong format (i.e., special characters). The fact that we do not run this imaginary login application on one of our servers does not matter for the sake of this exercise: All we want is to configure the LoadMaster and if the request passes the LoadMaster WAF and hits the backend, then we will simply get a 404 and that’s OK.
There is more detailed information available on this configuration available from netnea.com tutorials, under step 8 here.
So, we would look to create a file titled modsecurity_allowlist.conf with the following contents
SecMarker BEGIN_ALLOWLIST_login

# START allowlisting block for URI /login SecRule REQUEST_URI "!@beginsWith /login" \
    "id:11001,phase:1,pass,t:lowercase,nolog,skipAfter:END_ALLOWLIST_login"
SecRule REQUEST_URI "!@beginsWith /login" \
    "id:11002,phase:2,pass,t:lowercase,nolog,skipAfter:END_ALLOWLIST_login"

# Validate HTTP method
SecRule REQUEST_METHOD "!@pm GET HEAD POST OPTIONS" \
    "id:11100,phase:1,deny,status:405,log,tag:'Login Allowlist',\
    msg:'Method %{MATCHED_VAR} not allowed'"

# Validate URIs
SecRule REQUEST_FILENAME "@beginsWith /login/static/css" \
    "id:11200,phase:1,pass,nolog,tag:'Login Allowlist',\
    skipAfter:END_ALLOWLIST_URIBLOCK_login"
SecRule REQUEST_FILENAME "@beginsWith /login/static/img" \
    "id:11201,phase:1,pass,nolog,tag:'Login Allowlist',\
    skipAfter:END_ALLOWLIST_URIBLOCK_login"
SecRule REQUEST_FILENAME "@beginsWith /login/static/js" \
    "id:11202,phase:1,pass,nolog,tag:'Login Allowlist',\
    skipAfter:END_ALLOWLIST_URIBLOCK_login"
SecRule REQUEST_FILENAME \
    "@rx ^/login/(displayLogin|login|logout).do$" \
    "id:11250,phase:1,pass,nolog,tag:'Login Allowlist',\
    skipAfter:END_ALLOWLIST_URIBLOCK_login"

# If we land here, we are facing an unknown URI, # which is why we will respond using the 404 status code SecAction "id:11299,phase:1,deny,status:404,log,tag:'Login Allowlist',\
    msg:'Unknown URI %{REQUEST_URI}'"

SecMarker END_ALLOWLIST_URIBLOCK_login

# Validate parameter names
SecRule ARGS_NAMES "!@rx ^(username|password|sectoken)$" \
    "id:11300,phase:2,deny,log,tag:'Login Allowlist',\
    msg:'Unknown parameter: %{MATCHED_VAR_NAME}'"

# Validate each parameter's uniqueness
SecRule &ARGS:username  "@gt 1" \
    "id:11400,phase:2,deny,log,tag:'Login Allowlist',\
    msg:'%{MATCHED_VAR_NAME} occurring more than once'"
SecRule &ARGS:password  "@gt 1" \
    "id:11401,phase:2,deny,log,tag:'Login Allowlist',\
    msg:'%{MATCHED_VAR_NAME} occurring more than once'"
SecRule &ARGS:sectoken  "@gt 1" \
    "id:11402,phase:2,deny,log,tag:'Login Allowlist',\
    msg:'%{MATCHED_VAR_NAME} occurring more than once'"

# Check individual parameters
SecRule ARGS:username "!@rx ^[a-zA-Z0-9.@_-]{1,64}$" \
    "id:11500,phase:2,deny,log,tag:'Login Allowlist',\
    msg:'Invalid parameter format: %{MATCHED_VAR_NAME} (%{MATCHED_VAR})'"
SecRule ARGS:sectoken "!@rx ^[a-zA-Z0-9]{32}$" \
    "id:11501,phase:2,deny,log,tag:'Login Allowlist',\
    msg:'Invalid parameter format: %{MATCHED_VAR_NAME} (%{MATCHED_VAR})'"
SecRule ARGS:password "@gt 64" \
    "id:11502,phase:2,deny,log,t:length,tag:'Login Allowlist',\
    msg:'Invalid parameter format: %{MATCHED_VAR_NAME} too long (%{MATCHED_VAR} bytes)'"
SecRule ARGS:password "@validateByteRange 33-244" \
    "id:11503,phase:2,deny,log,tag:'Login Allowlist',\
    msg:'Invalid parameter format: %{MATCHED_VAR_NAME} (%{MATCHED_VAR})'"

SecMarker END_ALLOWLIST_login
Step 2: Upload custom rules file to LoadMaster
Now that the custom rules file is ready, it is a simple step to upload and make it available to the Virtual Service(s) on the LoadMaster.
Import the modsecurity_allowlist.conf into the LoadMaster in the Web Application Firewall located in the left-hand navigation, click on Custom rules, and select ‘Choose File’ to select the custom rule file under the title WAF Custom Rules.

Once the custom rules file is selected, select ‘Add Ruleset’ to finalize the uploaded.

The Custom Rules section allows for both custom rules and associated data files to be uploaded. Individual custom rules files can be loaded, as shown above, or as a package of rules in a gzip-compressed tar ball (.tar.gz). Data files are referenced from custom rules and must be uploaded before the corresponding custom rule file.
Custom rule files can be downloaded directly or deleted (if the custom rules are not in use by any Virtual Service).
Uploading the custom rules file via RESTful API is easily achieved as follows:
curl -X POST --data-binary "@./modsec_allowlist.conf" -k https://bal:password@<<LoadMaster IP Address>>/access/addowaspcustomrule\?filename\="./modsec_allowlist.conf"
Step 3: Assign the custom rules to a specific application (Virtual Service)
The LoadMaster Virtual Services (VS) provide the user the ability to configure specific settings (WAF, SSL, Content Rules, Authentication and SSO etc.) for an application.
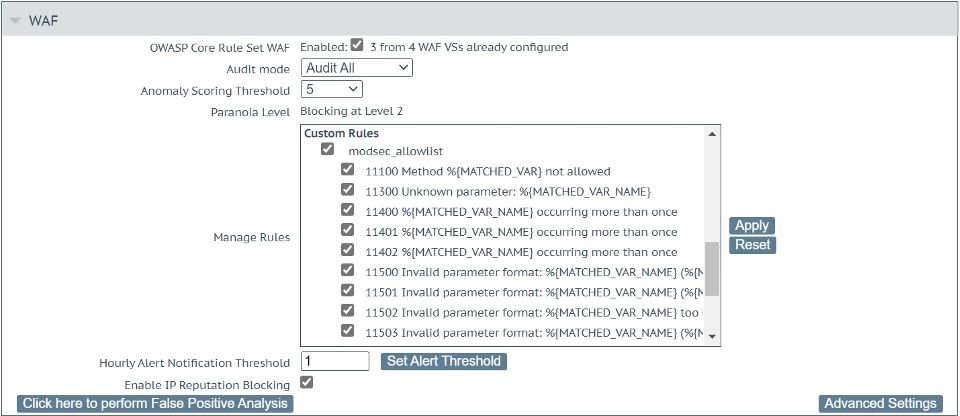
With the modsecurity_allowlist.conf imported, navigate to Virtual Services, View/Modify Services and select the application Virtual Service that this custom rule should be used with. Once selected, navigate to WAF. The custom rule file will be there, select the checkbox so the tick is available and click the ‘Apply’ button.
To see the individual rules in the modsecurity_allowlist.conf file, click on the file name modsec_allowlist. Individual custom rules can be selected here and disabled (or enabled) as appropriate. For the purposes of this blog, all the custom rules should be enabled as shown below.
To facilitate this example, we are configuring the Audit Mode to Audit All and setting a low Anomaly Scoring Threshold of 5.

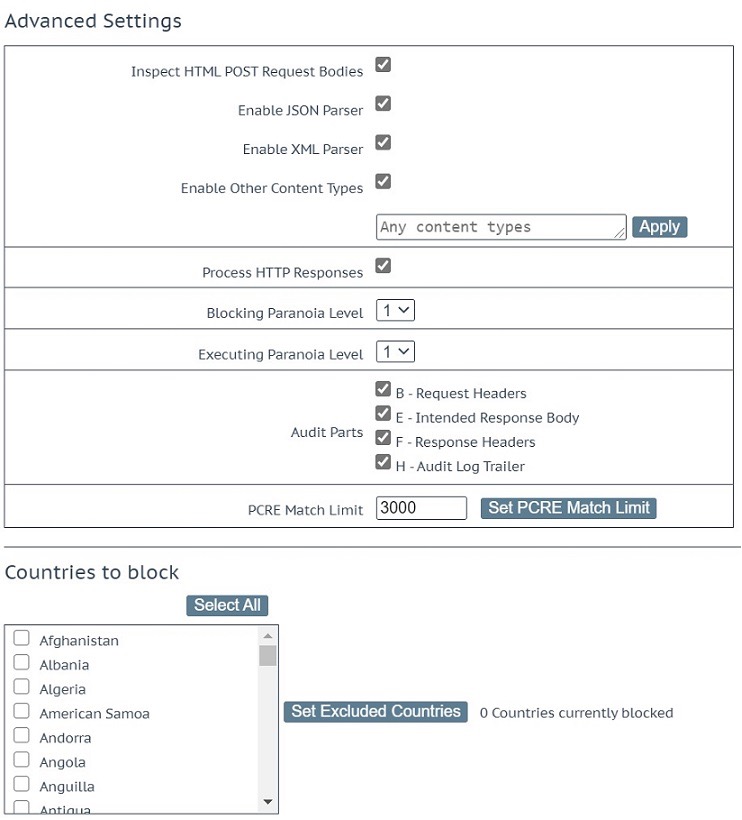
Under Advanced Settings, ensure that Inspect HTML POST Request Bodies is checked. This should result Enable JSON Parser, Enable XML Parser and Enable Other Content Types being checked. Ensure that Enable Other Content Types is checked, otherwise form parameters are ignored. This is shown in Figure 4 below.

Applying the custom rule file to the Virtual Service via RESTful API is easily achieved as follows:
curl -k https:// bal:password@<<LoadMaster IP Address>>/access/modvs\?vs\=<<Virtual Service IP>>\&port\=<<Virtual Service Port>>\&prot\=<<Virtual Service Protocol>>\&CustomRules\="modsec_allowlist"
The LoadMaster Virtual Service handling of custom rules includes the following features:
- If you upload a new rules file overwriting an existing one that has been enabled before, then the new version becomes active immediately
- If a new version of a rules file contains new rules, you do not need to enable them individually. They become active immediately
- If you try to overwrite an existing rules file with an empty file or with a file without any rules, this will fail, and the original version will persist
- You cannot delete a rules file if it is active on any Virtual Service
Step 4: Run a test to confirm all is working
For the purposes of this test, I am running a standard Apache server (version: 2.4.46) as my back-end application. There is no special configuration of the application, it is a default installation.
Running the first test, this will pass through the WAF to the application and result in a 404 error as expected.
Request
curl http://10.35.56.31/login/displayLogin.do
Response
<!DOCTYPE HTML PUBLIC "-//IETF//DTD HTML 2.0//EN">
<html><head>
<title>404 Not Found</title>
</head><body>
<h1>Not Found</h1>
<p>The requested URL was not found on this server.</p>
<hr>
<address>Apache/2.4.29 (Ubuntu) Server at 10.35.56.31 Port 80</address>
</body></html>
With the second test, there is an additional query string i.e., debug=1, that the WAF rule set does not know. In this, case the WAF will block the request with a 403 error.
Request
curl http://10.35.56.31/login/displayLogin.do\?debug\=1
Response
<html><head><title>403 Forbidden</title></head><body>Access denied</body>
Logs
There are several logs that the LoadMaster generates and the most interesting here is the WAF Event Log File under System configuration –Logging Options –System Log Files. The log generated from this access attempt is shown here:
2021-04-13T08:25:50+00:00 lb100 wafd: [client 10.0.31.231] ModSecurity: Access denied with code 403 (phase 2). Match of "rx ^(username|password|sectoken)$" against "ARGS_NAMES:debug" required. [file "/tmp/waf/2/modsec_allowlist.conf"] [line "39"] [id "11300"] [msg "Unknown parameter: ARGS_NAMES:debug"] [tag "Login Allowlist"] [hostname "10.35.56.31"] [uri "/login/displayLogin.do"] [unique_id "8aeea40b-c364-47c0-82db-3982b36e6bb7"]
We are looking at several entries in this log
- id which tells us that custom rule 11300 was hit
- msg to learn what happened, in this case an unknown parameter debug
- Access Denied indicating that this access attempt was blocked with a 403 error
The LoadMaster logs are mirrored to the ModSecurity logs and the mapping is:

Summary
Custom rules provide administrators a flexible way to create / customize their unique WAF configuration within LoadMaster for their specific application and allow the handling of false positives. Next week, we will demonstrate how False Positive analysis is performed on the LoadMaster and the enhanced visibility that this brings.
If you are currently looking at utilizing Web Application Firewall (WAF), make sure to check out the Kemp WAF here…
Read the rest of the OWASP CRS Series
Part 1: Introduction to OWASP CRSPart 2: How do you run OWASP CRS on load masterPart 3: Deploying custom rulesPart 4: False Positive AnalysisPart 5: Reporting
