
What is HashiCorp Vault
HashiCorp Vault is a secret management tool which allows you to secure, store and tightly control access to various types of sensitive data including tokens, passwords, certificates, and encryption keys. Vault provides a unified interface to interact with secrets, while also providing tight access control and recording a detailed audit log. HashiCorp Vault is primarily API-driven but also offers an intuitive user interface.
Vault encrypts data before writing it to the configured storage backend, which represents the location for the durable storage of Vault’s information. Vault supports over twenty different storage backends including integrated storage, Consul, Azure, S3, MySQL, and Cassandra. Each backend has pros, cons, and trade-offs. For example, certain backends support high availability while others provide a more robust backup process. For a full list of supported storage backends, check out the Vault documentation.
In this article we will be working with a Vault cluster using the Integrated Storage backend (also known as Raft) which is available as of Vault 1.4. This storage backend does not rely on any third-party systems, implements high availability, and provides backup/restore workflows. Raft storage backend is also one of the easier ones to configure and deploy as it does not require any extra nodes unlike in other storage backends such as Consul. In Raft, all nodes in the Vault cluster persist a replicated copy of the Vault data locally on the filesystem. Data gets replicated across the all the nodes using the Raft Consensus Algorithm.
Why put a load balancer in front of Vault?
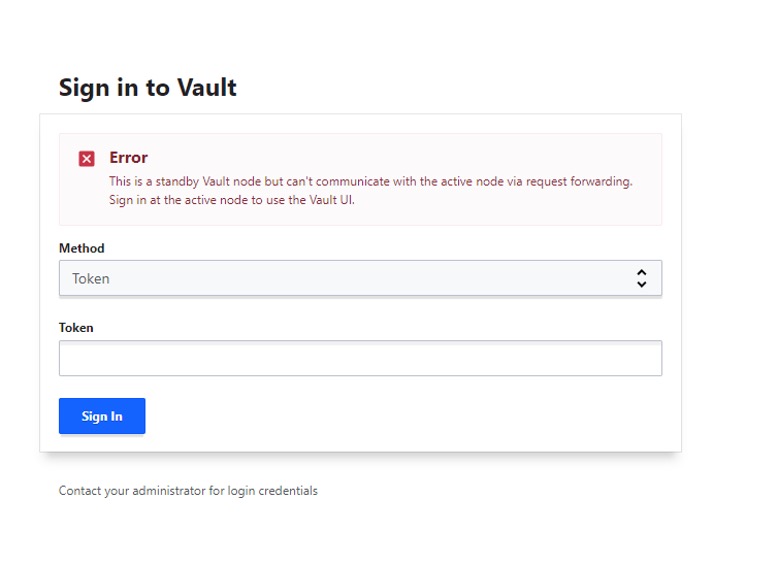
As previously mentioned, Vault operates as a cluster of nodes. Each node has an IP address and optionally an FQDN (Fully Qualified Domain Name). This means that to access the Vault UI/API you will need to use one of the node’s IP address/FQDN. This is not ideal because if that node fails, you will no longer be able to access Vault with that node IP/FQDN. This is especially true if you are integrating Vault with other applications such as your CI/CD platform or in fetching secrets from Vault in your scripts. Another problem with using a node’s IP/FQDN to access Vault is that if the node is not an active cluster node (i.e. leader), Vault will forward the request to the active node. This add unnecessary redirects to the request and from our experience, it can also cause connection issues as depicted in Figure 1 below.
The ideal solution is to have a single point of access to the Vault cluster. One FQDN you can use to access Vault at all times. This FQDN should always resolve to the active cluster node (leader) to avoid redirects and possible connection issues. You can achieve this by putting a Kemp LoadMaster load balancer in front of your Vault cluster and using Kemp GEO for FQDN resolution.
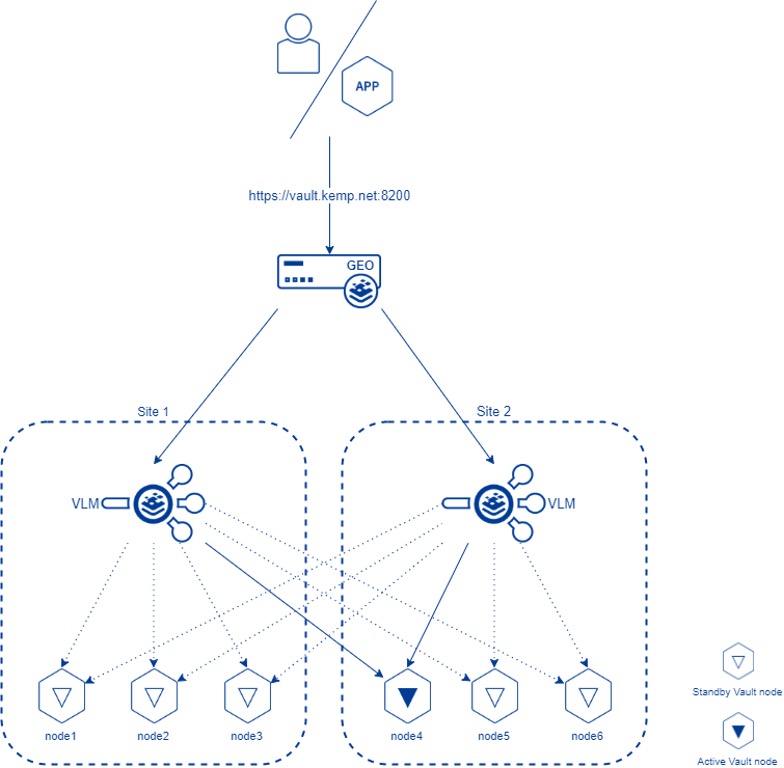
Example Vault Deployment with Kemp
Figure 2 below depicts an example Vault deployment which utilizes Kemp LoadMaster and Kemp GEO. The Vault cluster consists of six nodes and two Virtual LoadMasters (VLMs) deployed across two sites. Kemp GEO is used to as a DNS server to resolve the Vault cluster and node domain names.
The connection flow is explained below.
- User or an application want to access Vault at https://vault.kemp.local:8200 (the user/application uses Kemp GEO as a DNS server).
- The DNS query arrives at Kemp GEO and is resolved to the Virtual Service (VS) IP address on one of the VLMs. Which VS IP address is returned depends on the Selection Criteria method configured in GEO for that FQDN. It can be a simple Round Robbin or a more complex Proximity and Location Based method.
- Once the request arrives at the Virtual Service on the VLM, it will get forwarded to the active node of the Vault cluster.
- Kemp LoadMaster keeps track of the active Vault node with an advanced health checking method.
Kemp GEO Configuration
Before we dive into the LoadMaster configuration, we need to add the Vault node FQDNs to GEO so that the LoadMasters will be able to resolve the node names into IP addresses. Repeat steps 1-5 below for each Vault node in your cluster.
- In the main menu, navigate to Global Balancing > Manage FQDNs and scroll down to the Add a FQDN section.
- Here add the Fully Qualified Domain Name of the Vault node, for example node1.vault.kemp and click the Add FQDNbutton.
- On the FQDN configuration page add the node IP address in the Add a new IP Address section and click the Add Address button
- For the Checker select Icmp Ping
- Leave the rest of the setting as defaults
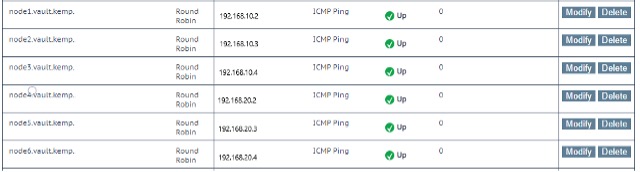
By now you should have all your Vault node FQDNs added as depicted in the figure below.
LoadMaster Configuration
You will need to have a hardware or virtual Kemp LoadMaster deployed. For a quick setup, you can download and deploy a Free Virtual LoadMaster (VLM). In this article, we are using two Virtual LoadMasters (VLMs) deployed on across two sites on a VMware vSphere hypervisor.
Creating a Virtual Service
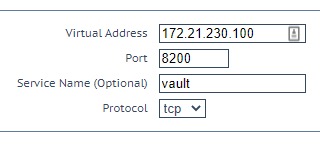
On the LoadMaster’s main menu select Virtual Services > Add New and fill in the Virtual Service (VS) details as shown in Figure 4 below. The Virtual Address is the IP address which will be used to reach your Vault cluster. This can be any address in the same network as the LoadMaster. If you are going to use this LoadMaster solely for Vault, this address can be the same as the IP address of the LoadMaster. Port must be set to same value as the address port in the listener stanza of the Vault node configuration which is typically set to 8200. Service Name can be set to some meaningful name to identify this Virtual Service. Protocol should be set to tcp. Click the Add this Virtual Service button to create the VS.
Once the Virtual Service is created you will be brought to the VS Properties page. Here, you need to set the Service Typeunder Basic Properties to HTTP-HTTP/2-HTTPS as shown in Figure 5 below.

Adding Real Servers
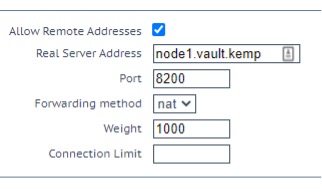
Now that you have the basic Virtual Service configured, you need to add Real Servers to it. The Real Servers in this case are the Vault nodes. On the VS properties page, under Real Servers click Add New and add the Vault nodes one by one. For each Vault node, set the Real Server Address to the IP address or FQDN of the Vault node and the Port to the address port used in the node configuration (typically 8200). Leave the rest of the settings as defaults as show in Figure 6.
Note: If you are going to use node FQDNs instead of the IP addresses, the LoadMaster must be able to resolve the FQDNs. You can update LoadMaster nameservers under System Configuration > Network Setup > Host & DNS Configuration.
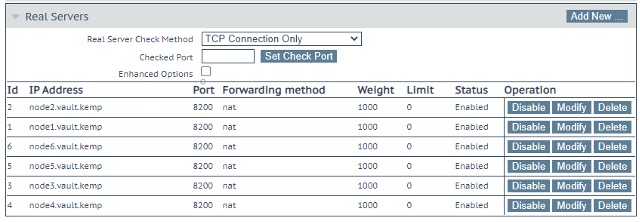
After adding all your Vault nodes, you will see them listed in the Real Servers section of the VS properties page as show in Figure 7 below.
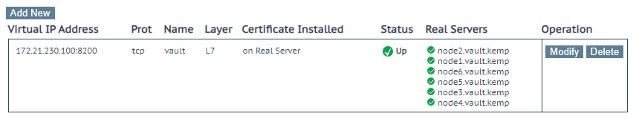
Now, if you go back to Virtual Services > View/Modify Services you will notice that all Vault nodes are seen as online by the LoadMaster as depicted in the figure below. With this configuration, requests received by the Virtual Service would be forwarded to the Vault nodes in a Round Robbin fashion. To forward requests only to the active node, we need to setup the correct Real Server health check.
Configuring Real Server Health Checks
To configure the correct Real Server health check so that the LoadMaster can detect the active Vault node follow the below steps.
- Navigate to Virtual Services > View/Modify Services > Modify and scroll down to the Real Servers section.
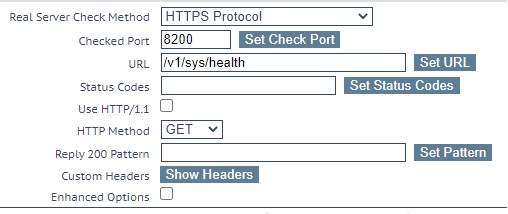
- For the Real Server Check Method select HTTPS Protocol if you are using TLS in your Vault cluster. Otherwise select HTTP Protocol instead.
- Set the Check Port to the same value as the port on the real servers (i.e. the address port of the node which is typically 8200) and click Set Check Port.
- Set the URL to /v1/sys/health and click Set URL
- Lastly, set the HTTP Method to GET.
The /v1/sys/health is a special Vault API that can be called without authentication. It returns a JSON object with some node metadata and HTTP status code 200 if the node is the active cluster node and 429 if the node is a standby cluster node. The HTTP codes returned by this API allow the LoadMaster to determine the active cluster node and hence correctly forward traffic received at the Virtual Service.
Now, if you navigate back to Virtual Services > View/Modify Services, you will see that only one of the nodes is seen as online by the LoadMaster. This is the active cluster node. All other nodes have failed the Real Server health check meaning the /v1/sys/health API returned HTTP status code 429. With this health check in place, all traffic arriving at the Virtual Service IP will be forwarded to the active Vault node.

You can run a curl on the /v1/sys/health API to confirm that the node reported as the active node by the LoadMaster is in fact the active cluster node. You can see that the below command returned standby: false meaning the node is not a standby node. Hence it must be the active node.
$ curl -ks https://node1.vault.kemp:8200/v1/sys/health | jq
{
  "initialized": true,
  "sealed": false,
  "standby": false,
  "performance_standby": false,
  "replication_performance_mode": "disabled",
  "replication_dr_mode": "disabled",
  "server_time_utc": 1598274150,
  "version": "1.4.1",
  "cluster_name": "vault-cluster-3ff0b544",
  "cluster_id": "b039f05d-247f-972c-029e-5075877c2dcb"
}
Testing Node Failover
To see the Real Server health check in action, you can force Vault to elect a new active node by running this CLI command on the currently active node.
$ vault operator step-down

Success! Stepped down: https://127.0.0.1:8200
To find the new active node run the following CLI command:
$ vault status

Key                      Value
---                      -----
...truncated...
HA Enabled               true
HA Cluster               https://node4.vault.kemp:8201
HA Mode                  standby
Active Node Address      https://node4.vault.kemp:8200
In this case, node4.vault.kemp has been elected as the new active node of the cluster. We can verify that the LoadMaster has immediately detect the new active node using the Real Server health check as seen in Figure 11.

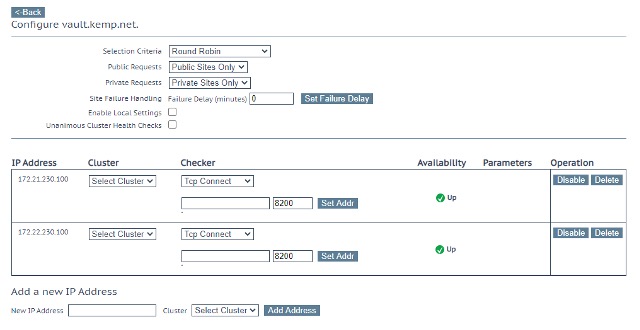
Adding Vault Cluster FQDN to GEO
The last step is to add a new FQDN to GEO which will be used to access the Vault cluster instead of using the individual node domain names. In your Kemp GEO, follow the below steps and also see Figure 12.
- In the main menu, navigate to Global Balancing > Manage FQDNs and scroll down to the Add a FQDN section.
- Here add the Fully Qualified Domain Name you want to use to access the Vault cluster. For example, vault.kemp.netand click the Add FQDN button.
- For each Virtual Service you have:
- On the FQDN configuration page add the Virtual Service IP address in the Add a new IP Address section and click the Add Address button.
- For the Checker select Tcp Connect and change the port from 80 to the port of the VS (in this example 8200)
- Leave the rest of the setting as defaults
- The Selection Criteria can be left as Round Robbin or set to something more complex such as:
- Proximity based so that GEO returns the IP which is geographically closer to the client
- Fixed Weight for an active-passive setup where the same IP is returned unless the health check on that VS is failing.
Now, you will be able to access the Vault cluster using the new FQDN defined in Kemp GEO. This FQDN should be used as a single point of access to Vault, as it will always resolve to the active Vault node.
Availability for Critical Data
Hashicorp Vault is designed to manage secure and sensitive data. This type of data usually has high availability requirements. Adding load balancing to Vault with Kemp LoadMaster can give you the peace of mind that you want when managing this type of data. Using the load balancer’s ability to manage the FQDN for critical applications like Vault will make your application infrastructure dependable for your developers and users alike.
