
This blog will run through the prerequisites and steps to deploy and run the Progress Kemp LoadMaster in Google Cloud. The accompanying video is available here.
Prerequisites:
1. Ensure you have a permission serviceusage.service.enable on your project to run Compute Engine API for managing Virtual Machines
2. Make sure your service account has roles Service Account Token Creator role (roles/iam.serviceAccountTokenCreator), Service Account User role (roles/iam.serviceAccountUser) and Compute Admin role (roles/compute.admin)
3. Enable Cloud Build API in your project.
Deploying:
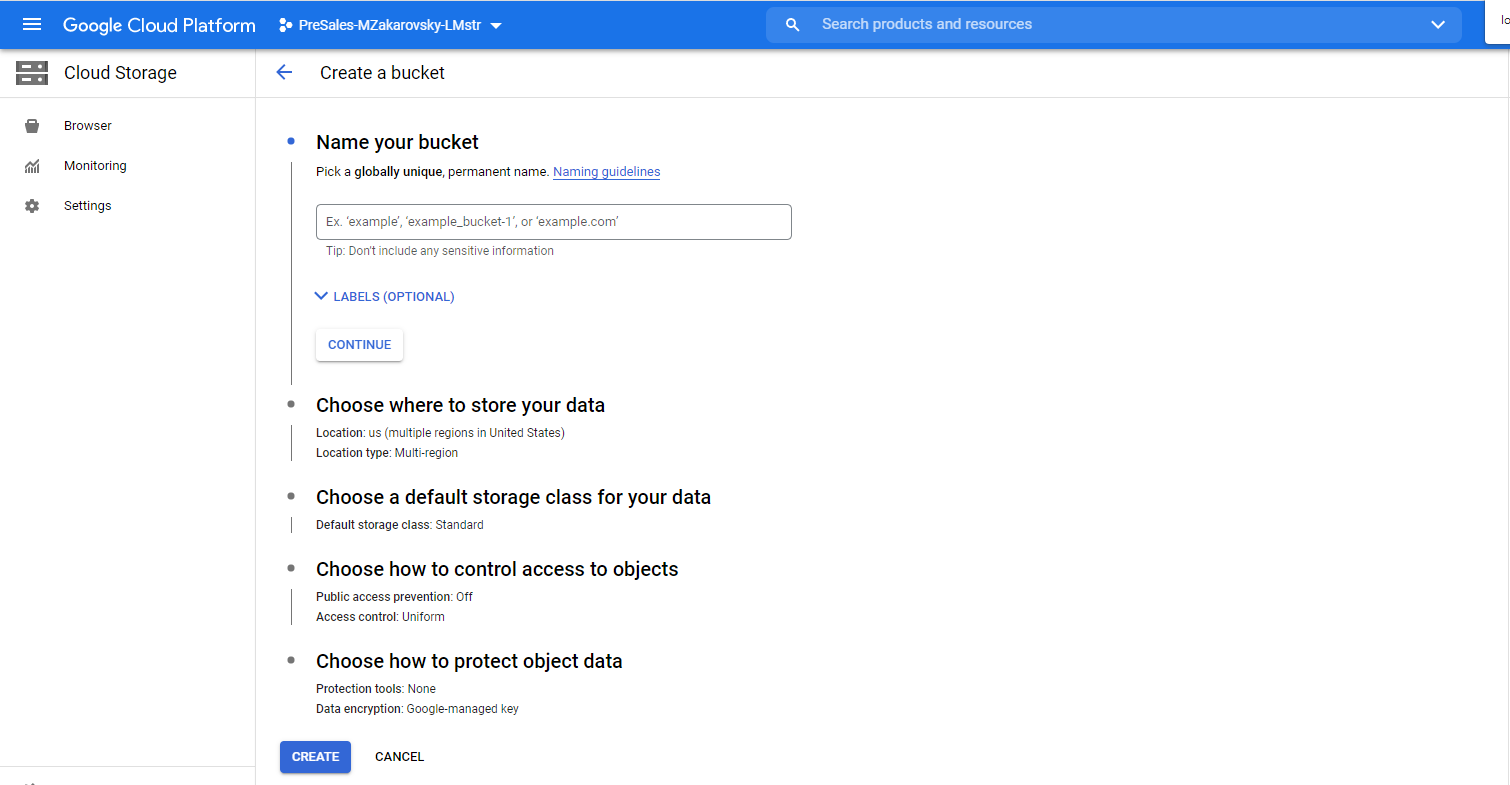
1. Under “Storage” switch to “Cloud Storage” and under the “Browser” section create a bucket by “Create Bucket”. Fill a “Name your bucket” and choose where to physically store your data. Choose default storage class for your data. Choose how to control access to objects and voluntarily Enforce public access prevention on this bucket. Choose how to protect object data too. Hit the “CREATE” button eventually.
2. After your bucket is ready just add data to the bucket. Upload your Progress Kemp LoadMaster image by clicking “UPLOAD FILES” and locate the file itself from your local machine. You might upload VMware based vmdk file or HyperV based vhd file.
3. Under “Compute” switch to “Compute Engine” and in the section “Storage” click on “Images”. Create image clicking “CREATE IMAGE”, give a “Name” to your image, select a “Source” of your file to create an image from as “Virtual Disk (VMDK, VHD)” and browse for the file itself you uploaded to your bucket in “Cloud Storage File”. Under “Operating system on virtual disk” choose “No operating system. Data only”. Hit the “Create” button eventually.
4. Under “Compute” switch to “Compute Engine”, section “Virtual machines” and “VM instances”. Create new VM instance clicking “CREATE INSTANCE”. Give it a “Name” and for “Machine Configuration” section, under “Machine type” specify at least “e2-small” (2 x vCPU , 2 GB memory). For “Boot disk” section click on “CHANGE”. Switch to “CUSTOM IMAGES” and “SELECT A PROJECT” you want to use the image from to show all images. Under Image chose your image to deploy. Don’t forget to specify at least 17 GB disk space under “Size(GB)”. Hit the “SELECT” button. Under “Firewall” allow also HTTPS traffic (potentially HTTP traffic for future LoadMaster Real Server deployment) and hit the “CREATE” button
Post-Deploying Configuration:
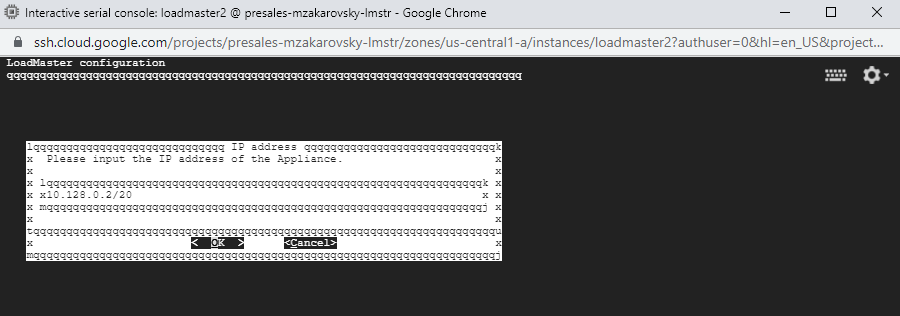
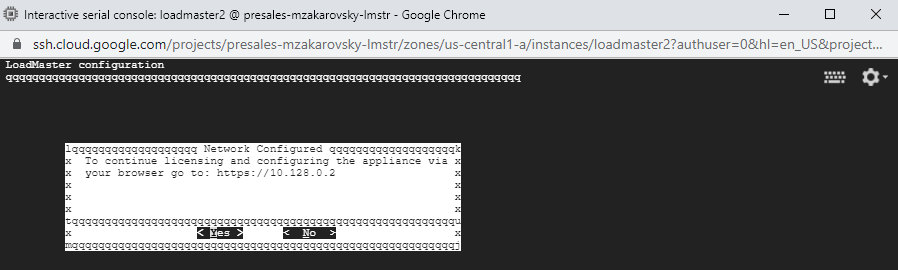
1. Under “Compute” switch to “Compute Engine”, section “Virtual machines” and under “VM instances” click on your newly created LoadMaster VM instance. Select “EDIT”, enable the checkbox “Enable connecting to serial ports” and hit “Save” button. Subsequently “CONNECT TO SERIAL CONSOLE” and explore how your machine is booting.
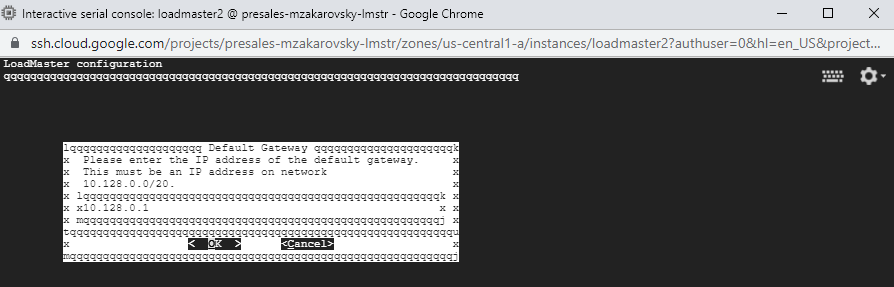
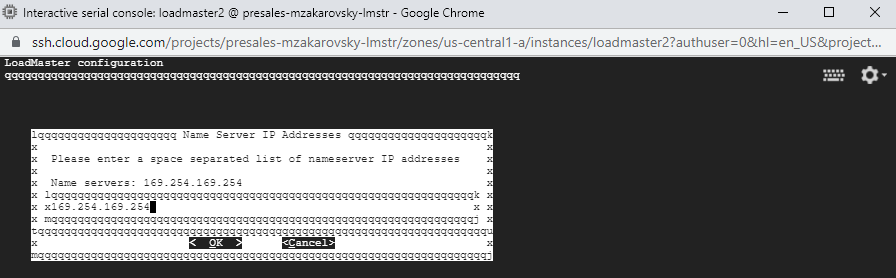
2. Once booting is finished, enter the default credentials (bal, 1fourall). Confirm the predefined IP address yet amend the subnet mask to /20 to align with the VPC Networks configuration within GCP. Confirm the predefined default gateway and nameserver. If required enter HTTP(S) proxy server and port. Hit “OK” nevertheless.

3. Type the IP address of the device to the browser, license and configure the appliance. Make sure you type the external IP address instead of internal one and that you use protocol https.
Real Server Configuration limitation
When configuring Real Server on the same subnet as your Virtual IP Address is, make sure you configure static route on LoadMaster. Google Cloud Platform network is based on Software Defined Network and when ARP packet is sent from Virtual IP address to broadcast IP address, asking for a particular IP address-MAC address resolution, it is not delivered to the Real server at all. Thus LoadMaster doesn’t have an information about MAC address of a Real Server. Communication is therefore unsuccessful. Configuring static route overcomes such limitation. Static routes are configured in “System Configuration”, “Network Setup” and “Additional Routes”.
Congrats on your LoadMaster deployment! Please let us know your feedback through the TPP program here.
