
Lots of customers are still running an older version of Exchange server, for example Exchange 2010 and Exchange 2013. While this still works good, Microsoft will stop support for Exchange 2010 on October 13, 2020. That’s only three months from the time of writing. The product won’t stop working on October 13, 2020 but Microsoft will not support it anymore and more important, security hotfixes will no longer be released. The latter is a strong case to upgrade your Exchange 2010 environment.
Support for Exchange 2013 will end on April 11, 2023. Still a couple of years away but when you’re running Exchange 2013 you should start thinking about upgrading to Exchange 2016 or Exchange 2019 anytime soon. However, the scope of this article is on upgrading Exchange 2010.
I also did a webinar on this topic, you can find this here: The best known methods on Upgrading Microsoft Exchange
Upgrade paths
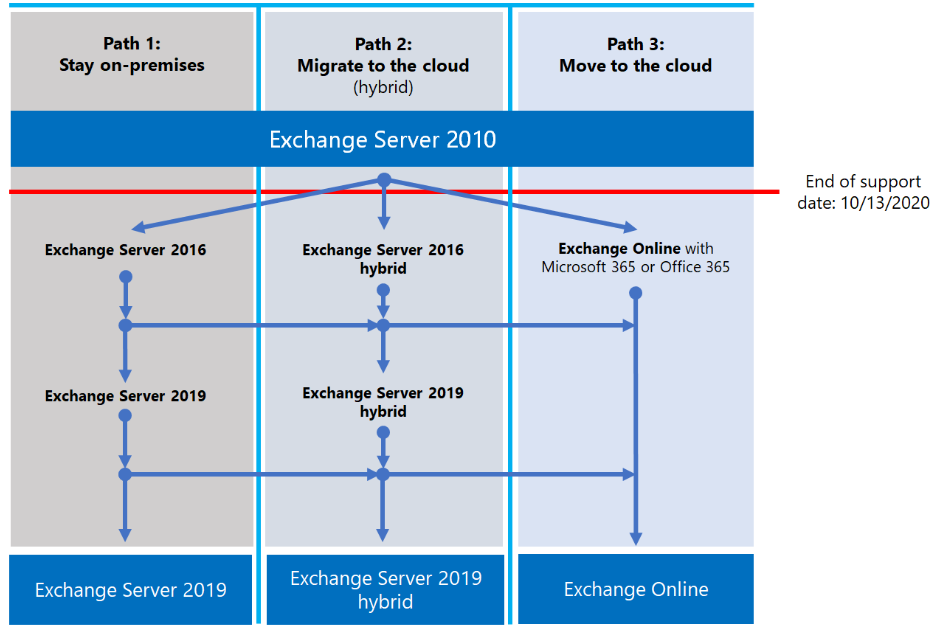
When upgrading your Exchange 2010 evnironment you have three options:
- Upgrade your environment to Exchange 2016. Because of the n-2 support policy of Microsoft it is not possible to migrate from Exchange 2010 directly to Exchange 2019. This option is blocked in the setup application of Exchange 2019.
- Migrate to the cloud in a hybrid environment (mailboxes both on-premises and online). You can start this directly from Exchange 2010.
- Migrate everything to the cloud and keep zero mailboxes on-premises using the cutover migration.
This is shown in the following figure.
I will discuss the three options below.
Migrate to Exchange 2016
Upgrading from Exchange 2010 to Exchange 2016 is relatively easy and consists of the following steps:
- Design your Exchange 2016 environment.
- Build and configure your Exchange 2016 environment.
- Change client access to your Exchange 2016 environment.
- Move resources to Exchange 2016.
- Decommission Exchange 2010.
Designing a solid Exchange 2016 environment is important since it will prevent performance issues and thus complaining users. For designing an Exchange 2016 you must use the Exchange Requirements Calculator.
The requirements calculator is an interactive spreadsheet. You enter the variables like number of mailboxes, mail usages (sent and received), average message size, number of users, high availability deployment, virtualization etc. and based on these numbers it will return a design with a number of servers, storage options etc. Very useful and very important.
When moving to Exchange 2016, you must build completely new Exchange servers. There’s no upgrade possibility to upgrade the existing Exchange 2010 servers. Only the mailbox servers exist in Exchange 2016, which includes the client access and hub transport roles. The best option is to use an unattended install to ensure all Exchange 2016 servers are deployed the same way. Even better is to use the automatic install script written by fellow MVP Michel de Rooij (https://gallery.technet.microsoft.com/office/Exchange-2013-Unattended-e97ccda4) which also automatically install all prerequisite software and server roles. After installing the Exchange 2016 servers you should configure the storage that will host the Mailbox databases and configure a Database Availability Group (DAG) when needed.
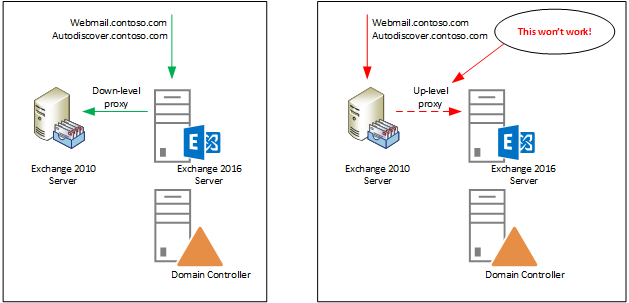
Clients accessing in a coexistence scenario with Exchange 2010 and Exchange 2016 can be tricky. Proxy functionality is only down-level. This means that client accessing Exchange 2016 can be proxied to Exchange 2010, but clients accessing Exchange 2010 cannot be proxied to Exchange 2016. So, the down-level proxy functions perfectly, the up-level proxy won’t work as shown in the following figure.
Load balancing in Exchange 2016 is very different then in Exchange 2010. In Exchange 2010 load balancing is statefull, the availability of the server is based on an ICMP check (basically a PING) or if a connection can be setup on port 443 (basically a telnet connection on port 443) without any additional checks.
In Exchange 2016 the load balancer will use the Exchange Managed Availability services on the Exchange servers. A Virtual Services (VS) on the load balancer consist of several sub-VS’s and each sub-VS check the availability of its service. So, there are separate sub-VS’s for OWA, ECP, Web Services, ActiveSync, Mapi etc and sub-VS checks the individual service running on the Exchange 2016 server. This means that OWA can be available on a particular server, but web services can fail on the same server. The load balancer will automatically switch to a different server, only for web services in this example.
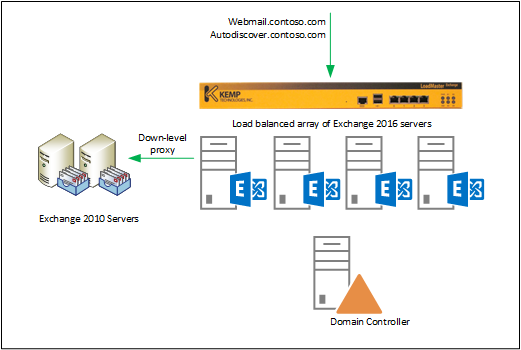
Figure 4. A load balancerd array for Exchange 2016 servers, again you can see the down-level proxy functionality.
It is recommended to use the templates provided by Kemp when configuring the load balancer. You can download these templates from https://support.kemptechnologies.com/hc/en-us/articles/210136133-Templates.
The most important part when moving from Exchange 2010 to Exchange 2016 is when you have configured the load balancer for Exchange 2016 and switch the DNS to use Exchange 2016 instead of Exchange 2010. When you have successfully made this step, the hard part is over.
When Exchange 2016 is fully configured and up-and-running (i.e. clients accessing Exchange 2016) you can move resources to Exchange 2016. This is fully transparent for users; they won’t notice if they are on Exchange 2016 or still on Exchange 2010. They also won’t notice if their mailbox is already on Exchange 2016 and mailboxes of their colleagues are still on Exchange 2010. Moving a mailbox includes a downtime of maybe a minute for users. When the mailbox is moved, Outlook needs to be restarted.
I prefer to move mailboxes off business hours. When users logon the next morning they will start Outlook and continue working normally.
When everything is moved to Exchange 2016 you can decommission Exchange 2010. This is not just a matter of deleting VM’s. This will result in all kinds of strange issues since the Exchange 2010 will still be available in Active Directory. Please use the uninstall option in Control Panel to officially decommission Exchange 2010.
Migrate to Exchange online in a hybrid environment
In an Exchange hyrid environment you have mailboxes in Exchange on-premises and mailboxes in Exchange Online. When configured correctly this is fully transparent for users. They can see each other’s free/busy information, mail tips, access shared mailboxes etc. Microsoft Exchange on-premises will see and treat Exchange Online as part of its own Exchange deployment and thus see it as safe. An email from a mailbox in Exchange Online to a mailbox in Exchange on-premises is treated as an internal message.
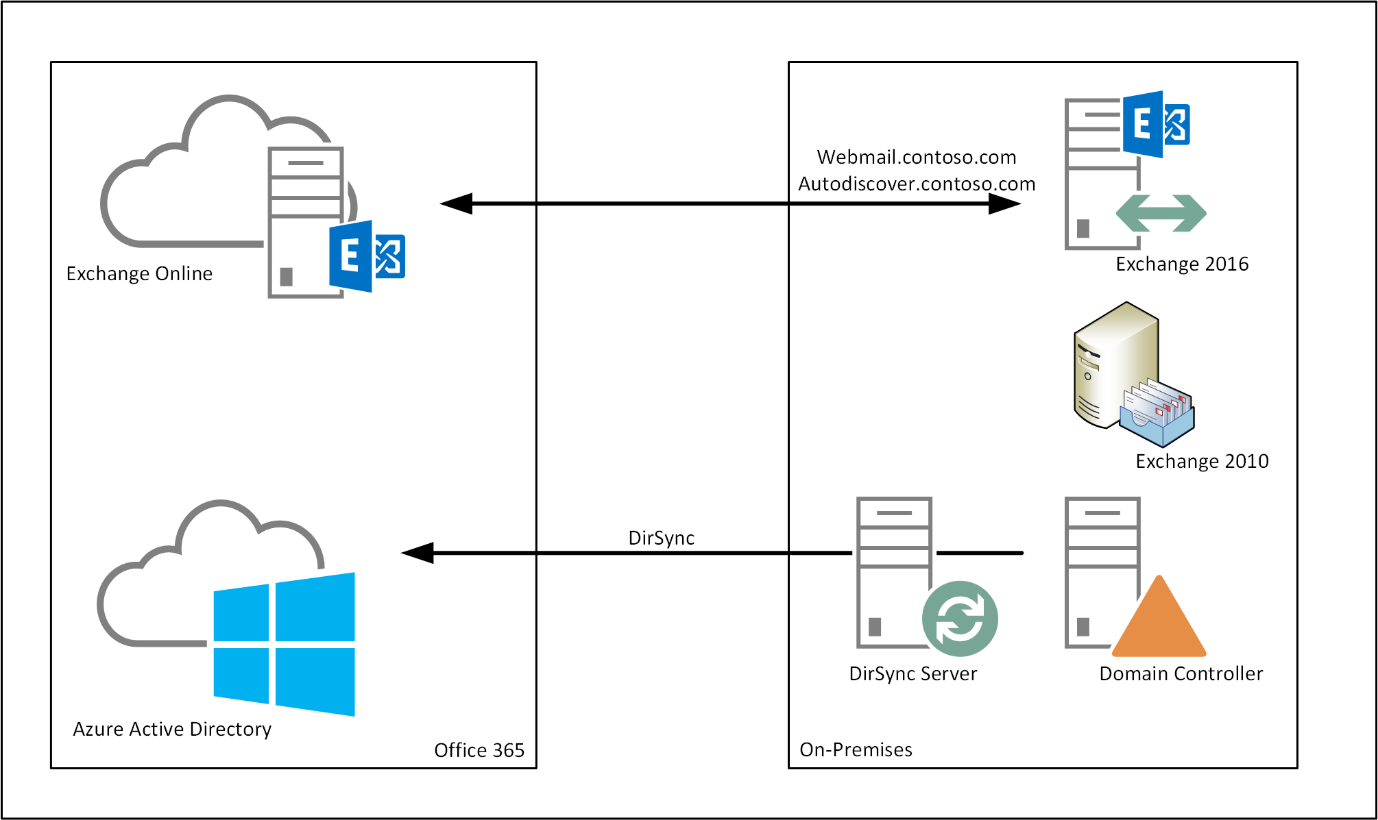
You can configure Exchange 2010 in a hybrid scenario (as outlined in my blogpost Moving from Exchange 2010 to Exchange Online) or implement an Exchange 2016 into the existing Exchange 2010 environment. People sometimes refer to this Exchange 2016 server as the ‘hybrid server’. Officially this is not entirely true, the hybrid server is where you run the Hybrid Configuration Wizard (HCW) but when configured correctly with the correct URL’s as shown in the following figure it should work fine.
When doing this you are already halfway a migration to Exchange 2016 as outlined in the previous section. The advantage of this is that at the end you can move remaining mailboxes to Exchange 2016 and decommission Exchange 2010 without any additional projects.
A couple of important prerequisites you have to be aware of before taking this route:
- You need to have Azure AD Connect in place.
- SMTP domains need to be added to your Office 365 tenant.
- Use the N-1 latest Cumulative Update for Exchange 2016.
- No pre-authentication in front of Exchange 2016 (I have seen a TMG 2010 server recently in front of Exchange 2016!).
- No SMTP device in front of Exchange 2016 (Exchange 2016 Edge Transport is an exception to this).
Moving mailboxes from Exchange 2010 to Exchange Online is very similar to moving mailboxes from Exchange 2010 to Exchange 2016. It is fully transparent; users will hardly notice anything. Again, I always recommend moving mailboxes off business hours so users can start Outlook the next morning without any hassle.
When all mailboxes are in Exchange Online, you can move the remaining mailboxes to Exchange 2016 and decommission Exchange 2010. Be aware of the same pitfalls as in the previous section: do not just delete the VM’s but uninstall Exchange 2010 nicely using Control Panel.
But how about that last Exchange server if you have all mailboxes in Exchange Online? I’m afraid you still have to keep this last Exchange server on-premises since it is used for management purposes when Azure AD Connect is in place. Objects are managed in on-premises Active Directory (source of authority) and changes made to objects are then synchronized with Azure Active Directory (i.e. Office 365). Microsoft is aware of this and working on a solution, but in the mean time you have to keep this last Exchange server up-and-running.
Migrated to Exchange online using cutover migration
The last option is to move everything to Exchange Online and keep nothing on-premises, not even Azure AD Connect. You basically switch from using Active Directory to Office 365 and keep nothing on-premises. I see this in smaller organizations (less then 100 users) where they don’t need the hassle of managing stuff on-premises.
In Microsoft terms, this is called the cutover migration, it is supported for Exchange 2003 and higher with a maximum of 2000 mailboxes. When selecting the cutover migration, you can use the Microsoft native tools, or you can use a third-party tool lit BitTitan to move your data. The advantage of a third-party tool is that the migration is much more controllable compared to the native tooling from Microsoft.
The cutover migration consists of the following steps:
- Copy all user accounts from Active Directory to Office 365 (using PowerShell script or CSV file).
- Copy all contents from the mailboxes in Exchange on-premises to Exchange Online.
- Switch MX records from Exchange on-premises to Exchange Online.
- Configure your Autodiscover record to use Exchange Online.
- Configure Outlook clients.
- Decommission Exchange and Active Directory on-premises.
The cutover migration is also referred to as a ‘big bang’ migration. On a Friday night you switch the MX records and Autodiscover records and new mail will automatically be delivered in the new mailboxes. Then you have all weekend to reconfigure all Outlook clients. This way users start Outlook on Monday morning and automatically connect to Exchange Online.
Downside? These are new mailboxes with new Outlook profiles, so each Outlook client must build a new .OST file. In a typical environment this means that a lot data (all mailbox data) needs to be downloaded during that weekend. When not completed on Monday morning it will continue during business hours, and potentially impact performance.
I have done these kinds of migration, but not that much. In my experience it’s more the smaller organization that select this way of migrating.
Summary
When you are still running Exchange 2010 you only have three months left at the time of writing before support for Exchange 2010 will stop. The product will continue to work, but no more security patches will be released by Microsoft and that will be an issue in the near future.
Your options are to migrate to Exchange 2016 on-premises (I still do have customers that do this, and don’t have any mailboxes in the cloud) or create a hybrid environment with Exchange 2016 and Exchange Online. Most of my customers opt for that solution.
You can use Exchange 2010 to build a hybrid environment, but most customers nowadays implement Exchange 2016 before creating a hybrid environment. That’s fine, if you realize that you are halfway an Exchange 2016 migration when taking that route.
Another thing to realize, although it looks relatively easy to create a hybrid environment it really is not. I have a lot of customers that built a hybrid environment themselves, especially with Exchange 2016 in the mix only to find out that it is more complex than they initially thought. Be aware of this!
